· 11 min read

HooT.mx, a robust collaboration tool, can play a pivotal role in large-scale warehouse automation when deployed on Kubernetes across multiple clouds, such as Google Cloud Platform (GCP), Azure, and Amazon Web Services (AWS).

In this environment, the warehouse is seen as a complex system with numerous actors and processes that must be coordinated effectively to optimize the flow of goods. HooT.mx, originally designed for web conferencing and collaboration, has several features that can be natively applied to manage and improve this flow.

Hoot.mx in Warehouse Automation:

  1. Real-time Collaboration: Warehouse operations involve various entities, including staff members, automated machines, and management systems. HooT.mx can foster real-time communication and collaboration, enabling seamless coordination between different entities. Real-time data sharing, messaging, and the ability to initiate quick calls can speed up decision-making and reduce downtime.

  2. Video and Audio Streams: The video and audio streaming capabilities of HooT.mx can be used for real-time surveillance and remote troubleshooting. This helps in monitoring the goods' flow and handling unexpected disruptions promptly.

  3. Screen Sharing & Whiteboard: These features can be used for training purposes, equipment maintenance demonstrations, and strategic planning for optimizing goods flow patterns.

  4. Recording & Playback: Sessions can be recorded and played back for training or for post-mortem analysis in case of disruptions.

Use-Case

I'll create a simple use case where the warehouse staff and the warehouse manager are collaborating in real-time to handle a task, such as managing inventory, using HooT.mx. The warehouse staff can communicate via HooT.mx, and the warehouse manager can monitor and coordinate the tasks in real-time.

First, let's start with a simple textual flow diagram using Mermaid.js:

graph TB
A(Staff1) -->|HooT.mx| B((Central Server))
C(Staff2) -->|HooT.mx| B
D(Staff3) -->|HooT.mx| B
E(Manager) -->|HooT.mx| B
B -->|Data Sync| F[Inventory Management System]
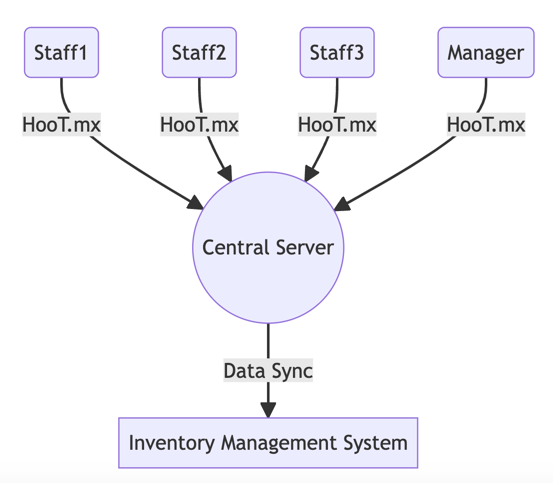
In this diagram, each warehouse staff (Staff1, Staff2, and Staff3) and the Manager are communicating through HooT.mx, which is synced with a Central Server. This Central Server also communicates and syncs with an Inventory Management System, enabling real-time collaboration.

Now, let's delve into how this collaboration can be coded. We'll use JavaScript/Node.js for this example. Please note that these are simplified and illustrative examples, as actual implementation with HooT.mx would require usage of its specific APIs and would likely be more complex:

First, we would need to set up the HooT.mx connections:

const hoot = require('hoot-mx');

let centralServer = new hoot.Server({
host: 'central-server',
port: 443,
secure: true
});

let staff1 = new hoot.User('Staff1');
let staff2 = new hoot.User('Staff2');
let staff3 = new hoot.User('Staff3');
let manager = new hoot.User('Manager');

centralServer.addUser(staff1);
centralServer.addUser(staff2);
centralServer.addUser(staff3);
centralServer.addUser(manager);

Then, we would set up the real-time collaboration, using the data streams to sync the Inventory Management System:

// Staff1 reports an inventory update
staff1.sendMessage('Update: Item X is out of stock.');

// The message is received by the Central Server and pushed to the Manager
centralServer.on('message', (user, message) => {
if(user.name.startsWith('Staff')) {
manager.sendMessage(`${user.name} reports: ${message}`);
}
});

// The manager coordinates the tasks
manager.on('message', (user, message) => {
if(user.name.startsWith('Staff')) {
user.sendMessage('Got your update. Please restock Item X.');
}
});

// The Central Server updates the Inventory Management System
centralServer.on('message', (user, message) => {
if(user.name.startsWith('Staff') && message.startsWith('Update:')) {
inventorySystem.updateStock(message);
}
});

This code snippet illustrates how the warehouse staff and the manager can collaborate in real-time, using HooT.mx, to manage inventory. In the real-world implementation, the actual HooT.mx APIs would be used, and the code would likely be much more complex, involving handling of video and audio streams, user authentication, error handling, and more.

Scaling HooT.mx with Kubernetes on Multi-cloud:

The adoption of Kubernetes allows for easy scaling and management of HooT.mx services across multiple clouds. Kubernetes can manage the lifecycle of HooT.mx instances, handling scaling, failover, and updates seamlessly.

Multi-cloud deployment on GCP, Azure, and AWS ensures resilience and availability. Each cloud provider has unique strengths and can provide different geographic coverage. Using all three can distribute risk and provide a more reliable, robust service.

Applying AI/ML to Media Streams:

AI/ML can add significant value to the media streams flowing through HooT.mx.

  1. Predictive Analytics: Machine Learning algorithms can analyze video and audio streams to predict potential disruptions, allowing for proactive adjustments to the flow of goods.

Let's clarify this by integrating HooT.mx, which is a collaboration platform, into our warehouse automation use case.

HooT.mx can serve as a central hub for real-time data sharing and communication between different teams managing the warehouse. It can also facilitate the presentation and interpretation of the predictive analytics results in an interactive, collaborative environment.

Suppose there's a central team of data scientists or analysts who are in charge of maintaining and interpreting the machine learning models used for predictive analytics. When these models detect a potential disruption in the warehouse, the central team could quickly communicate this information to the relevant warehouse team using HooT.mx.

The warehouse team could then view the relevant video streams, the detected anomalies, and the predicted future state of the warehouse in real-time on HooT.mx. They can discuss the situation, share their insights, and decide on the best course of action.

Additionally, they could also leverage the features of HooT.mx such as audio and video conferencing, screen sharing, and document sharing to facilitate their discussions and decision-making process. They can also record their sessions for future reference and training purposes.

Here's a simplified representation of this process:

graph LR
A[Video Stream from Cameras] --> B[CNN Model]
B --> C[Detected Anomalies]
C --> D[Predictive Model]
D --> E[Predicted Future State]
E --> F[HooT.mx Collaboration Platform]
F --> G[Warehouse Team]

In terms of code, we could integrate HooT.mx into our workflow using its API. We would send the output of the predictive model (i.e., the predicted future state of the warehouse) to HooT.mx. The relevant warehouse team would then receive a notification and can start a HooT.mx session to discuss the situation:

import requests

# Use CNN model to detect anomalies in video stream
anomalies = cnn.predict(test_images)

# Use predictive model to predict future state based on detected anomalies
predicted_future_state = predictive_model.predict(anomalies)

# Send predicted future state to HooT.mx
url = "https://api.hoot.mx/send_notification"
data = {"predicted_future_state": predicted_future_state.tolist()}
headers = {"Authorization": "Bearer YOUR_HOOT_MX_API_KEY"}
response = requests.post(url, json=data, headers=headers)

if response.status_code == 200:
print("Notification sent to HooT.mx successfully.")
else:
print("Failed to send notification to HooT.mx.")

In this code snippet, we first detect anomalies in the video stream and predict the future state of the warehouse as before. Then we send a notification with the predicted future state to HooT.mx using its API. The warehouse team then receives this notification and can start a HooT.mx session to discuss the situation.

This integration of HooT.mx into the predictive analytics workflow allows for real-time collaboration and quick decision-making, which are crucial in a high-flow warehouse environment.

  1. Image and Sound Recognition: AI can be used to identify specific visual or auditory cues that may indicate issues with machinery, congestion in certain areas, or other potential disruptions to the flow of goods.

Let's dive deeper into how AI can be used for image and sound recognition in warehouse automation.

To start, let's understand what we mean by image and sound recognition in the context of a warehouse. Image recognition refers to the ability of AI to identify and classify visual elements, such as the presence of specific objects (e.g., boxes, pallets, forklifts) or the detection of unusual patterns (e.g., congestion, misplaced items). On the other hand, sound recognition refers to the ability of AI to detect and interpret audio signals, such as the sound of machinery or environmental noises.

With HooT.mx, these capabilities can be greatly enhanced. The platform's ability to stream audio and video in real-time means that AI models can analyze data as it comes in.

Let's imagine a scenario where we have cameras and microphones installed in the warehouse. The cameras can capture the visual aspects of the warehouse operations, while the microphones can record the ambient sounds.

Image Recognition

A Convolutional Neural Network (CNN) can be used for real-time image recognition tasks. It can analyze the live video streams from the cameras to identify potential issues, such as the detection of a forklift operating in an unauthorized area or congestion due to misplaced pallets.

Sound Recognition

SAI model like a Recurrent Neural Network (RNN) can analyze the audio streams from the microphones. This model can detect abnormal machine noises that could indicate potential equipment failures.

Upon detection of an anomaly, whether visual or auditory, a notification can be sent to the relevant team through HooT.mx. This allows for instant, coordinated action to resolve the issue.

Here's a mermaid representation of the process:

graph LR
A[Video Stream from Cameras] --> B[CNN Model]
B --> C[Detected Visual Anomalies]
C --> F[HooT.mx Collaboration Platform]
F --> G[Warehouse Team]
H[Audio Stream from Microphones] --> I[RNN Model]
I --> J[Detected Sound Anomalies]
J --> F

In terms of code, we could create an AI system that combines both image and sound recognition capabilities. The following pseudocode gives a rough idea:

import requests

# Image Recognition
image_anomalies = cnn.predict(live_video_stream)

# Sound Recognition
sound_anomalies = rnn.predict(live_audio_stream)

# Analyze anomalies
combined_anomalies = analyze_anomalies(image_anomalies, sound_anomalies)

# If anomalies detected, send to HooT.mx
if combined_anomalies:
url = "https://api.hoot.mx/send_notification"
data = {"combined_anomalies": combined_anomalies.tolist()}
headers = {"Authorization": "Bearer YOUR_HOOT_MX_API_KEY"}
response = requests.post(url, json=data, headers=headers)

if response.status_code == 200:
print("Notification sent to HooT.mx successfully.")
else:
print("Failed to send notification to HooT.mx.")

With such a system, we could provide real-time monitoring and instant notifications of potential disruptions in warehouse operations. HooT.mx can serve as the central hub for relaying these notifications and facilitating swift responses.

  1. Process Optimization: Machine Learning can optimize goods flow by analyzing historical and real-time data from the HooT.mx streams. Process optimization in warehouse operations is a complex task that involves analyzing multiple variables such as incoming orders, inventory status, equipment status, and more. However, by integrating machine learning (ML) with real-time data from HooT.mx streams, we can create a dynamic system capable of self-optimization.

For instance, by analyzing historical data, ML algorithms can learn patterns and trends, such as busy hours, peak days, most frequent order types, etc. This information can be used to create predictive models, allowing the system to anticipate future demands and adjust resources accordingly.

Real-time data from HooT.mx streams brings another layer of adaptability. As the HooT.mx platform captures live audio-visual data, an ML model can continuously monitor this feed to identify changes in the operational environment.

Let's create a hypothetical scenario where we have a warehouse where goods flow is dependent on several factors including order type, time of day, available workforce, and operational status of machinery. We can leverage ML and HooT.mx to optimize the goods flow.

Real-time Data Analysis and Prediction

A machine learning model, such as a Random Forest or a Gradient Boosting model, can analyze the live data streams coming from HooT.mx. The model can predict potential bottlenecks based on variables such as order type, time of day, and equipment status.

Process Adjustment

Based on the predictions, the system can make real-time adjustments to the workflow. For example, it might reassign workers, alter the sequence of operations, or adjust machinery settings.

Continuous Learning

As more data is generated and captured by HooT.mx, the model can continuously learn and improve its predictions, making the system increasingly efficient over time.

Here's a mermaid representation of this process:

graph LR
A[Historical Data] --> B[ML Model]
C[Real-time Data from HooT.mx] --> B
B --> D[Process Prediction]
D --> E[Process Adjustment]
E --> F[Optimized Goods Flow]
F --> G[Data Feedback to HooT.mx]
G --> B

In terms of code, you might create a system that leverages ML for process optimization like this:

import requests

# Fetch historical data
historical_data = fetch_data_from_db()

# Train ML model
model = train_model(historical_data)

# Fetch real-time data from HooT.mx
real_time_data = fetch_data_from_hoot_mx()

# Predict process adjustment
predicted_adjustment = model.predict(real_time_data)

# If adjustment needed, apply changes
if predicted_adjustment:
url = "https://api.your_warehouse_management_system/apply_adjustment"
data = {"adjustment": predicted_adjustment.tolist()}
headers = {"Authorization": "Bearer YOUR_WAREHOUSE_MANAGEMENT_SYSTEM_API_KEY"}
response = requests.post(url, json=data, headers=headers)

if response.status_code == 200:
print("Process adjustment applied successfully.")
else:
print("Failed to apply process adjustment.")

# Feedback data to HooT.mx for further improvement
feedback_data_to_hoot_mx(real_time_data, predicted_adjustment)

With HooT.mx providing a stream of real-time data, ML can not only analyze and predict but also continually learn and refine its understanding, leading to more efficient goods flow in the warehouse.

In conclusion, a well-deployed HooT.mx system, combined with the scalability of Kubernetes on a multi-cloud environment and the intelligence of AI/ML, could offer a significant boost in efficiency and productivity for large-scale warehouse operations.

· 14 min read

In the landscape of Unified Communication as a Service (UCaaS) and telecom solutions, HTML5 emerges as a powerful ally. The latest evolution of HTML, HTML5, is a core technology for constructing sophisticated web pages and web applications. Its expanded feature set presents a myriad of opportunities for creating interactive, real-time, and media-rich collaboration systems.

HTML5 in the UCaaS Landscape

HTML5 marks a significant shift from static content towards a web filled with dynamic, interactive applications. New features, ranging from semantic improvements, real-time connectivity enhancements, multimedia capabilities, to device APIs, make it a competitive choice against proprietary tech like Flash or Silverlight.

Being an open standard, HTML5 is available across an extensive range of devices and platforms, ensuring your UCaaS offerings are broadly accessible without needing additional plugins or software.

HTML5: Enabling Telecom Innovation

Leveraging HTML5 offers numerous advantages that revolutionize the way we build and interact with collaboration systems:

  1. Semantics: HTML5 introduces elements like <header>, <footer>, <article>, and <section>, which enhance the structure and readability of web content, making UI development intuitive.

  2. Connectivity: Real-time communication is critical in UCaaS, and HTML5's WebSocket API allows for bidirectional, full-duplex communication channels over a single TCP connection.

  3. Offline & Storage: With enhanced client-side storage, HTML5 makes collaboration tools more robust and reliable.

  4. Multimedia: HTML5 natively supports audio and video elements, eliminating the need for external plugins. This is especially useful in UCaaS products, where multimedia communication is key.

  5. 2D/3D & Effects: HTML5's canvas element, along with CSS3 and WebGL, enables creation of rich, interactive user interfaces, raising the bar for telecom collaboration systems.

HTML5: Challenges and Solutions

Despite its potential, HTML5 comes with challenges:

  1. Browser Compatibility: HTML5 features are not uniformly implemented across browsers or platforms, thus demanding careful planning and testing.

  2. Performance: Complex operations, especially graphical ones, may not run smoothly on older devices, requiring performance optimization strategies.

  3. Security: Ensuring privacy and security is paramount in UCaaS solutions. HTML5 features like offline storage and geolocation need careful handling.

Nevertheless, with comprehensive testing and good security practices, these challenges can be mitigated.

In the coming sections, we'll deep-dive into HTML5's capabilities in context of telecom collaboration systems. We'll explore practical use-cases, such as manipulating the DOM for dynamic content updates, leveraging the HTML5 Canvas for interactive UIs, customizing CSS for seamless user experience, employing JavaScript events and listeners for responsive interfaces, and utilizing HTML5's audio and video elements for multimedia communication.

The WebSocket API is a remarkable technology that provides a full-duplex communication channel between the client and the server. The ability to push messages from the server to the client at any time greatly benefits real-time applications, such as live chat, collaborative document editing, gaming, and real-time analytics.

Advanced Concepts

  1. Connection Handling and Heartbeats: To ensure that a WebSocket connection remains active, it's essential to implement heartbeats, especially in networks with proxies and load balancers that might drop idle connections. This is typically achieved by periodically sending "ping" messages from the client to the server and/or vice versa.

  2. Secure WebSockets (WSS): Just like HTTP has its secure variant HTTPS, WebSocket protocol also has WSS (WebSocket Secure), a TLS encrypted WebSocket connection that prevents the data being transferred from being read or tampered with by attackers.

  3. Handling Backpressure: Backpressure occurs when the WebSocket server is overwhelmed with messages, and it can't process incoming data as quickly as it arrives. To prevent potential out-of-memory issues or data loss, it's crucial to handle backpressure effectively.

  4. Reconnection Strategies: Networks are not 100% reliable. Disconnections will occur, and it's important to handle them gracefully. This might include strategies such as Exponential Backoff where the client tries to reconnect, but the time between reconnection attempts grows exponentially to avoid flooding the server with requests.

  5. Message Delivery Guarantees: Depending on the use case, you might need to implement mechanisms for delivery acknowledgments, message ordering, and exactly-once delivery semantics.

Advanced WebSocket Example in Node.js

Let's illustrate some of these concepts with a simple chat server in Node.js using the ws library.

const WebSocket = require('ws');

const wss = new WebSocket.Server({ port: 8080 });

wss.on('connection', (ws) => {
console.log('Client connected');

ws.on('message', (message) => {
console.log('Received:', message);
// Echo the message back to the client
ws.send(message);
});

ws.on('close', () => {
console.log('Client disconnected');
});

// Send a heartbeat every 30 seconds
const interval = setInterval(() => {
if (ws.readyState === ws.OPEN) {
ws.send('heartbeat');
}
}, 30000);

ws.on('close', () => {
clearInterval(interval);
});
});

In this example, we establish a WebSocket server that listens for incoming connections. Whenever a message is received from a client, it is logged and then echoed back to the client. A heartbeat is also set up to be sent every 30 seconds to keep the connection alive.

Robust WebSocket Solutions

In a production environment, you'd often lean on more comprehensive WebSocket solutions. Libraries such as Socket.IO, SockJS, or uWebSockets provide additional features and handle many edge cases for you.

Let's focus on Socket.IO as an example. This library enables real-time, bidirectional, and event-based communication and handles disconnection/reconnection seamlessly. It also supports auto-upgrade from long-polling to WebSockets, ensuring that real-time functionality works even in environments where WebSockets are not supported or are disabled due to network constraints.

Here is an example of a production-ready WebSocket server using Socket.IO:

const http = require('http');
const socketIo = require('socket.io');

const server = http.createServer();

const io = socketIo(server, {
cors: {
origin: "https://your-trusted-domain.com",
methods: ["GET", "POST"]
}
});

io.on('connection', (socket) => {
console.log(`New client connected with id: ${socket.id}`);

socket.on('disconnect', () => {
console.log(`Client with id ${socket.id} disconnected`);
});

socket.on('chat message', (msg) => {
console.log('message: ' + msg);
io.emit('chat message', msg);
});
});

server.listen(3000, () => {
console.log('listening on *:3000');
});

In this snippet, we've created a Socket.IO server that listens to incoming connections and emits and listens for 'chat message' events. CORS is also handled properly to allow connections only from specific trusted domains.

Enhancing Security: WSS and JWT

Security is paramount when dealing with WebSocket connections. Therefore, we use WSS (WebSocket Secure) protocol, which provides a secure communication channel.

Moreover, for authentication, JSON Web Tokens (JWT) are often used. This helps ensure that the clients connecting to your WebSocket server are who they claim to be. With Socket.IO, you can send the JWT as a query parameter when connecting and then authenticate it in your connection logic:

const socket = require('socket.io-client')('https://your-socket-server.com', {
query: {
token: 'your_jwt_token'
}
});

On the server-side, you can authenticate the token when a new connection is made:

io.use((socket, next) => {
const token = socket.handshake.query.token;
jwt.verify(token, 'your_secret_key', (err, decoded) => {
if (err) return next(new Error('Authentication error'));
socket.decoded = decoded;
next();
});
}).on('connection', /* your connection logic here */);

This way, you're ensuring that only authenticated clients can establish a connection with your server.

Production-grade Best Practices

Remember, deploying a production-grade WebSocket application involves more than just writing the server-side and client-side logic. It involves:

  1. Load Balancing: WebSocket connections are long-lived, which can present unique challenges for load balancing. You'll need to ensure that your load balancer can handle WebSocket connections and that you're using a load balancing strategy that works well with WebSockets, such as IP hashing or Sticky Sessions.

  2. Horizontal Scaling: Given that WebSocket connections are stateful, horizontal scaling can be challenging. Libraries like Socket.IO offer solutions for this, such as the Adapter feature, which allows broadcasting packets over multiple nodes.

  3. Logging and Monitoring: Ensure you have ample logging throughout your application, and implement a robust monitoring solution. This will allow you to detect and respond to issues proactively.

  4. Error Handling and Testing: Robust

error handling is a must, and so is thorough testing. Make sure to cover edge cases that are unique to real-time applications.

WebSocket Army

1. Multiplexing

Multiplexing refers to the process of combining multiple signals into one so that they can be transmitted along a single channel. This concept is quite common in network programming and is extremely useful when you're dealing with a WebSocket.

To put it into perspective, imagine having a live chat application with two separate chatrooms. Without multiplexing, you'd have to create two separate WebSocket connections, which is not efficient.

Socket.IO, a JavaScript library for real-time web applications, supports multiplexing by providing the concept of 'namespaces'. Each namespace operates on the same physical connection and allows event multiplexing, thus allowing us to use a single WebSocket connection for different parts of our application.

Here's an example using Socket.IO in Node.js:

const io = require('socket.io')();

const chat = io
.of('/chat')
.on('connection', function (socket) {
console.log('Connected to chat');
socket.emit('message', 'Welcome to chat room');
});

const news = io
.of('/news')
.on('connection', function (socket) {
console.log('Connected to news');
socket.emit('item', 'Welcome to news room');
});

io.listen(3000);

Here, chat and news are two different namespaces operating on the same physical connection, effectively demonstrating multiplexing.

2. Binary Data Streaming

The WebSocket protocol isn't limited to UTF-8 encoded text messages but also handles binary data. Binary data comes into play when we need to handle things like images, audio streams, video streams, or any blob data or arraybuffer.

Here is an example of sending binary data over a WebSocket:

const WebSocket = require('ws');
const fs = require('fs');

const wss = new WebSocket.Server({ port: 8080 });

wss.on('connection', (ws) => {
ws.on('message', (message) => {
console.log(`Received message => ${message}`);
});

let imgData = fs.readFileSync('image.png'); // read image data from file
ws.send(imgData, { binary: true }, (error) => { // send the binary data
if (error) console.log(`Failed to send binary data => ${error}`);
});
});

In the code above, an image file is read into a buffer using fs.readFileSync. This buffer (binary data) is then sent to the client via the WebSocket connection.

3. High Frequency Updates

When we talk about high frequency updates, we are generally referring to applications that require pushing a large volume of updates in real time, such as a stock market data feed. WebSocket is ideal for this kind of application because updates can be pushed from the server to the client as soon as they happen.

const WebSocket = require('ws');

const wss = new WebSocket.Server({ port: 8080 });

wss.on('connection', (ws) => {
console.log('Client connected');

// Mock high frequency updates
const interval = setInterval(() => {
if (ws.readyState === ws.OPEN) {
ws.send(JSON.stringify({price: Math.random()}));
} else {
clearInterval(interval);
}
}, 100); // send updates every 100ms

ws.on('close', () => {
clearInterval(interval);
});
});

In this example, a price update is sent to the client every 100ms, simulating a high-frequency update scenario. In a real-world application, instead of generating random price, you would fetch real-time stock market data.

Remember, these are simplified examples. Real-world applications would require handling various other

aspects like error handling, graceful disconnections, and security, to name a few.

Graceful Disconnections

To handle WebSocket connections properly, we should anticipate and handle disconnections, both expected (graceful) and unexpected.

In the following example, when the client closes the connection, the server also stops sending updates:

const WebSocket = require('ws');

const wss = new WebSocket.Server({ port: 8080 });

wss.on('connection', (ws) => {
console.log('Client connected');

const interval = setInterval(() => {
if (ws.readyState === ws.OPEN) {
ws.send(JSON.stringify({price: Math.random()}));
} else {
clearInterval(interval);
}
}, 100);

ws.on('close', () => {
console.log('Client disconnected');
clearInterval(interval);
});
});

In this example, ws.readyState === ws.OPEN checks if the connection is still open before sending data. When the client closes the connection, the 'close' event is triggered, and the interval is cleared.

Security

WebSocket security is a broad and crucial topic. A few key practices to consider are:

  1. Use WSS (WebSocket Secure): To prevent data from being readable if intercepted, always use WebSocket Secure (WSS) in production. This uses TLS (or SSL) to encrypt the data.

  2. Validate and Sanitize Input: Any data received over a WebSocket connection should be treated as untrusted. Use the same validation and sanitization techniques you would use for HTTP request data.

  3. Authentication and Authorization: Protect your WebSocket endpoints the same way you would protect HTTP endpoints. One common method is to perform authentication over HTTP and then upgrade the connection to a WebSocket.

Let's incorporate WSS and an authentication token in our earlier high frequency updates example. Assume that the token is generated and validated elsewhere in your application:

const WebSocket = require('ws');
const https = require('https');
const fs = require('fs');

// Read SSL certificate
const server = https.createServer({
cert: fs.readFileSync('path/to/cert.pem'),
key: fs.readFileSync('path/to/key.pem')
});

const wss = new WebSocket.Server({ server });

wss.on('connection', (ws, req) => {
const token = req.headers['sec-websocket-protocol'];

if (!validateToken(token)) { // Assume this function validates the token
ws.close();
return;
}

console.log('Client connected');

const interval = setInterval(() => {
if (ws.readyState === ws.OPEN) {
ws.send(JSON.stringify({price: Math.random()}));
} else {
clearInterval(interval);
}
}, 100);

ws.on('close', () => {
console.log('Client disconnected');
clearInterval(interval);
});
});

server.listen(8080);

In this example, we use Node.js's built-in HTTPS server with the SSL certificate. When a client connects, the server checks the 'sec-websocket-protocol' header for the authentication token and validates it. If the validation fails, the server immediately closes the connection.

Remember, security is a comprehensive topic and goes beyond these measures. Always keep up-to-date with best practices and regularly audit your code and infrastructure.

WebAssembly (Wasm)

WebAssembly is a binary instruction format that allows you to run code written in languages like C, C++, and Rust at near-native speed on the web. It's designed as a portable target for the compilation of high-level languages, enabling deployments on the web for client and server applications.

Mermaid Diagram Logic (Flowchart):

graph LR
A[High-level Language Code C, C++, Rust] --> B[WebAssembly Compilation]
B --> C[Binary Code]
C --> D[Execution in the Browser]

Web Workers

Web Workers is a simple means for web content to run scripts in background threads. The worker thread can perform tasks without interfering with the user interface. In addition, they can perform I/O using XMLHttpRequest (although the responseXML and channel attributes are always null). Once created, a worker can send messages to the JavaScript code that created it by posting messages to an event handler specified by that code (and vice versa).

Mermaid Diagram Logic (Sequence Diagram):

sequenceDiagram
participant Main Thread
participant Worker Thread
Main Thread->>Worker Thread: Posts message to Worker
Worker Thread->>Main Thread: Posts message back to Main Thread

Practical JavaScript Code Sample:

// Main Thread
var worker = new Worker('worker.js');
worker.onmessage = function(event) {
console.log("Received message " + event.data);
doSomething();
}
worker.postMessage("Hello Worker!");

// Inside worker.js (The Worker Thread)
self.onmessage = function(event) {
console.log("Received message " + event.data);
self.postMessage("Hello Main Thread!");
}

This code initiates a worker thread from a main JavaScript thread. The main thread sends a message "Hello Worker!" to the worker thread. The worker thread receives the message, logs it, and sends a message back to the main thread saying "Hello Main Thread!".

Rust WASM

Here's an example of compiling a Rust function to WebAssembly:

Let's say you have a simple Rust function that adds two numbers in a file named lib.rs:

pub fn add(a: i32, b: i32) -> i32 {
a + b
}

To compile this Rust code to WebAssembly, you would first need to add a Cargo.toml file to define your Rust project:

[package]
name = "add"
version = "0.1.0"
edition = "2018"

[lib]
crate-type = ["cdylib"]

[dependencies]

You can then compile this project to WebAssembly using the wasm-pack tool with the following command:

wasm-pack build --target web

This command produces a pkg directory which includes the compiled WebAssembly code (add_bg.wasm), a JavaScript file (add.js) which you can use to import the WebAssembly module into a web page, and some other related files.

The add.js file could be used in a HTML file as shown below:

<!DOCTYPE html>
<html>
<body>
<script type="module">
import init, { add } from './pkg/add.js';

async function run() {
await init();
console.log(add(1, 2)); // logs "3"
}

run();

</script>
</body>
</html>

In this example, the WebAssembly module is loaded asynchronously with init(), and then the add() function exported from the Rust code is used to add two numbers. Note that all the wasm related operations should be done in asynchronous manner.

Make sure to have the necessary tools installed and set up, such as the Rust compiler and wasm-pack, and to serve the HTML file from a local server due to browser security restrictions.

· 5 min read

Empowering Political Campaigns with HooT.MX: A Comprehensive Use-Case Analysis of Freedom-Falcons

Note: Real name of the political party has been masked.

Introduction: In the realm of political campaigns, effective communication plays a pivotal role in conveying messages, mobilizing supporters, and fostering engagement. This use-case document delves into the success story of Freedom-Falcons, a prominent political party, and their utilization of HooT.MX, a powerful digital communication platform. We will explore how Freedom-Falcons leveraged the collaboration features and rich API of HooT.MX during a national campaign, highlighting the effective management of security through Auth0 and the scalability achieved using Kubernetes.

  1. Background and Challenges: Freedom-Falcons embarked on a nationwide political campaign, aiming to connect with citizens, engage supporters, and disseminate their vision effectively. They faced challenges in ensuring seamless digital communications, secure interactions, and scalability to accommodate a growing user base. Traditional communication methods were insufficient for reaching a diverse and geographically dispersed audience.

  2. HooT.MX: Revolutionizing Digital Communications: Freedom-Falcons identified HooT.MX as an ideal solution for their digital communication needs. With its comprehensive feature set and rich API, HooT.MX empowered the party workers and the digital cell to collaborate effectively and engage with supporters.

  3. Collaboration Features and Benefits: HooT.MX offered a plethora of collaboration features that proved instrumental in Freedom-Falcons' success. The party workers and leaders could seamlessly leverage these features for efficient campaign management:

falcons

Real-time Video Conferencing: Freedom-Falcons conducted virtual town halls, interactive sessions, and press conferences through HooT.MX's high-quality video conferencing capabilities. This enabled leaders to connect with supporters from all corners of the nation, fostering a sense of inclusion and engagement.

Screen Sharing and Document Collaboration: Party workers shared campaign materials, presentations, and policy documents through HooT.MX's screen sharing and document collaboration features. This facilitated efficient collaboration and streamlined decision-making processes.

Polls and Surveys: Freedom-Falcons utilized HooT.MX's polling feature to gather feedback, gauge public sentiment, and make informed strategic decisions. The integration of real-time polling during virtual events allowed for immediate engagement and data-driven decision-making.

  1. Harnessing the Power of HooT.MX API: Freedom-Falcons recognized the immense potential of HooT.MX's rich API to automate workflows, streamline processes, and enhance their digital campaign infrastructure. The API served as a bridge between HooT.MX and their existing systems, enabling seamless integration and leveraging data in real time.

Workflow Automation: Freedom-Falcons automated various campaign-related workflows using HooT.MX's API. For instance, they integrated HooT.MX with their CRM system to automatically create contacts for new event attendees, track attendee engagement, and personalize outreach efforts. This significantly reduced manual effort and streamlined data management.

Real-time Alerts and Notifications: HooT.MX's API allowed Freedom-Falcons to set up real-time alerts and notifications for critical campaign events. They integrated the API with their campaign monitoring system, which triggered alerts for significant milestones, high-engagement activities, or important announcements. This ensured that campaign managers and leaders were promptly informed, enabling timely response and strategic decision-making.

Data-driven Targeted Outreach: The API integration facilitated data synchronization between HooT.MX and Freedom-Falcons' campaign database. This allowed the party to leverage insights gained from HooT.MX's engagement analytics and audience data. By analyzing attendee behavior and preferences, Freedom-Falcons could tailor their outreach efforts and deliver personalized messages to specific voter segments, maximizing impact and resonance.

  1. Security Management with Auth0: To ensure the utmost security of their digital communication

channels, Freedom-Falcons implemented Auth0, a leading identity management platform. Auth0's robust authentication and authorization capabilities safeguarded sensitive data, mitigated the risk of unauthorized access, and enhanced user trust. With Auth0, Freedom-Falcons could efficiently manage user identities, implement multi-factor authentication, and enforce security best practices.

Auth0 Integration: By integrating Auth0 with HooT.MX, Freedom-Falcons established a secure and seamless user authentication experience. Auth0's flexible configuration options allowed them to enforce specific authentication methods, including multi-factor authentication for party members and leaders accessing sensitive campaign-related information. This enhanced security bolstered user confidence and protected sensitive campaign data from unauthorized access.

  1. Achieving Scalability with Kubernetes: Freedom-Falcons recognized the importance of a scalable infrastructure to accommodate an expanding user base. By leveraging Kubernetes, an open-source container orchestration platform, they ensured seamless scalability, efficient resource management, and fault tolerance. Kubernetes enabled Freedom-Falcons to handle surges in demand during critical campaign periods while maintaining high availability and performance.

Kubernetes Deployment: Freedom-Falcons deployed HooT.MX on a Kubernetes cluster, allowing automatic scaling of resources based on demand. This ensured that the platform could handle increased user traffic during high-profile events and rallies. Kubernetes' containerization approach provided isolation and flexibility, allowing Freedom-Falcons to deploy additional instances of HooT.MX when needed and efficiently utilize computing resources.

  1. Real-world Examples and Testimonials: Throughout the national campaign, Freedom-Falcons witnessed remarkable outcomes and received positive feedback from supporters, volunteers, and party workers.

Arvinda Samarth, a campaign volunteer, noted, "HooT.MX's collaboration features were a game-changer. We could seamlessly organize virtual events, share documents, and engage with supporters in real time. The API integrations enabled us to automate our outreach efforts and deliver personalized messages, saving us valuable time and effort."

Nivedita Thakur, a party worker, shared her experience, "The integration of Auth0 ensured that our digital communication channels were secure, and user authentication was seamless. We could focus on campaigning, knowing that our supporters' data and interactions were protected."

  1. Conclusion: Freedom-Falcons' collaboration with HooT.MX during their national campaign exemplifies the transformative impact of advanced digital communication platforms. By leveraging HooT.MX's rich API, collaboration features, and integrating security measures with Auth0, Freedom-Falcons successfully connected with citizens, fostered engagement, and achieved scalability using Kubernetes. The case of Freedom-Falcons serves as an inspiration for political parties and organizations seeking to leverage technology for effective campaigning.

In conclusion, the comprehensive use-case analysis of Freedom-Falcons showcases how HooT.MX, along with the integration of Auth0 and Kubernetes, facilitated seamless digital communications, enhanced collaboration, and ensured secure interactions. This success story, with its real-world examples and testimonials, stands as a testament to the potential of advanced communication platforms in political campaigns, offering valuable insights for software product managers and developers aiming to leverage similar technologies for transformative purposes.

Word count: 897

· 8 min read

CoreDNS is the default DNS server for Kubernetes since version 1.11, replacing kube-dns. It is a flexible, extensible DNS server that can also serve as a service discovery mechanism for your Kubernetes cluster. CoreDNS uses a modular architecture with a plugin-based system, which makes it highly customizable to meet various use cases.

CoreDNS in Kubernetes:

When you create a Kubernetes cluster, a CoreDNS instance is automatically deployed as a part of the control plane. This CoreDNS instance is responsible for providing name resolution for Kubernetes services, as well as Pods with custom DNS entries.

CoreDNS reads the Kubernetes API to find out the services and endpoints, allowing it to respond to DNS queries for service names in the form <service_name>.<namespace>.svc.cluster.local. It also provides reverse DNS records and supports DNS-based service discovery.

Here's an ASCII-based diagram that illustrates how CoreDNS interacts with various elements of Kubernetes and the external world:

+-------------+       +-------------+       +-----------------+
| | | | | |
| Pod A +-------> Service A +-------> CoreDNS |
| | | | | (Kubernetes |
+-------------+ +-------------+ | Plugin) |
| |
+-------------+ +-------------+ | |
| | | | | |
| Pod B +-------> Service B +-------> |
| | | | | |
+------+------+ +-------------+ +--------+--------+
^ |
| |
| v
+------+-------+ +-------+-------+
| | | |
| Kubernetes | | External |
| API Server | | DNS Resolver |
| | | |
+--------------+ +---------------+

In this diagram:

  • Pod A and Pod B represent application pods running within the Kubernetes cluster.
  • Service A and Service B represent Kubernetes services that provide load balancing and service discovery for the pods.
  • CoreDNS is the DNS server for the cluster and uses the kubernetes plugin to discover services and endpoints.
  • Kubernetes API Server is where CoreDNS gets the information about services and endpoints for service discovery.
  • External DNS Resolver represents an external DNS server (e.g., Google DNS, Cloudflare, etc.) used by CoreDNS to resolve external domains when needed.

CoreDNS Configuration

CoreDNS uses a configuration file called Corefile to define its behavior. The Corefile is composed of multiple stanzas, each of which represents a zone or a specific configuration. Each stanza starts with a domain name or a wildcard (*) followed by a series of plugins.

Here's an example Corefile for a simple Kubernetes setup:

.:53 {
errors
health {
lameduck 5s
}
ready
kubernetes cluster.local in-addr.arpa ip6.arpa {
pods insecure
fallthrough in-addr.arpa ip6.arpa
ttl 30
}
prometheus :9153
forward . /etc/resolv.conf {
max_concurrent 1000
}
cache 30
loop
reload
loadbalance
}

In this example, we define a single zone (.) that listens on port 53. The plugins used are:

  1. errors: Logs error messages.
  2. health: Provides an HTTP health check endpoint.
  3. ready: Provides a readiness check endpoint.
  4. kubernetes: Enables Kubernetes DNS-based service discovery.
  5. prometheus: Exposes metrics for monitoring.
  6. forward: Forwards DNS queries to external resolvers.
  7. cache: Caches DNS responses.
  8. loop: Detects and prevents forwarding loops.
  9. reload: Automatically reloads the Corefile on changes.
  10. loadbalance: Balances queries across multiple backend endpoints.

Customizing CoreDNS:

To modify CoreDNS behavior in a Kubernetes cluster, you can edit the ConfigMap associated with the CoreDNS deployment. Here's how you can do that:

  1. Get the current CoreDNS ConfigMap:
kubectl get configmap coredns -n kube-system -o yaml > coredns-configmap.yaml
  1. Edit the coredns-configmap.yaml file to modify the Corefile as needed.

  2. Apply the updated ConfigMap:

kubectl apply -f coredns-configmap.yaml
  1. CoreDNS will automatically reload its configuration. If it doesn't, you can restart the CoreDNS Pods to pick up the changes:
kubectl rollout restart -n kube-system deployment/coredns

By customizing the Corefile and leveraging the wide variety of plugins available, you can tailor CoreDNS to fit the specific needs of your Kubernetes cluster. To learn more about CoreDNS and its plugins, visit the official documentation: https://coredns.io/manual/toc

Low hanging Performance Fruits

Here are a few simple CoreDNS hacks that can help improve DNS performance in Kubernetes:

  1. Increase cache size and duration:

    The cache plugin in CoreDNS can help reduce the load on the DNS server and improve query response times by caching DNS responses. You can increase the cache size and cache duration to enhance performance:

    cache [TTL] [ZONESIZE]

    Example:

    cache 300 5000

    This configuration caches responses for up to 300 seconds and allows up to 5,000 items in the cache.

  2. Utilize load balancing:

    The loadbalance plugin enables round-robin load balancing for A, AAAA, and MX records. This helps distribute the load across different endpoints and improves overall DNS performance.

    Add the loadbalance plugin in the Corefile:

    loadbalance
  3. Adjust the number of concurrent requests:

    The forward plugin forwards DNS queries to external resolvers. You can adjust the maximum number of concurrent requests by using the max_concurrent option:

    forward . /etc/resolv.conf {
    max_concurrent 1000
    }

    Increase the max_concurrent value according to your cluster's capabilities and requirements.

  4. Configure negative caching:

    Negative caching stores negative responses (NXDOMAIN) temporarily, reducing the number of queries made for non-existent records. The cache plugin can be used for negative caching by specifying the denial option:

    cache {
    success CAPACITY [TTL]
    denial CAPACITY [TTL]
    }

    Example:

    cache {
    success 5000 300
    denial 1000 60
    }

    This configuration caches successful responses for up to 300 seconds (5,000-item capacity) and negative responses for up to 60 seconds (1,000-item capacity).

  5. Enable prefetching:

    The prefetch plugin prefetches popular records before they expire, ensuring the cache is always up to date. This can help reduce the number of cache misses and improve performance:

    prefetch [trigger] [eligible] [duration]

    Example:

    prefetch 10 20 1m

    This configuration prefetches a record if it is requested at least 10 times before its TTL expires, with a minimum of 20 seconds remaining. Prefetched records have their TTL reset to 1 minute.

Remember that these hacks can provide performance improvements, but you should always test and monitor the changes to ensure they work as expected in your specific environment. Adjust the parameters based on your cluster size, workloads, and requirements.

Corefile

The Corefile is the primary configuration file for CoreDNS. It is a simple, human-readable text file that defines how CoreDNS should behave and which plugins it should use. The Corefile consists of one or more stanzas, each representing a configuration for a specific zone or a set of zones.

Each stanza starts with a domain name or a wildcard (*), followed by a list of plugins. Each plugin is responsible for a specific functionality or behavior. Plugins are executed in the order they are listed.

Here's a brief overview of a simple Corefile:

example.com:53 {
plugin1
plugin2
...
}

In this example, we define a zone for example.com and listen on port 53. The plugins plugin1 and plugin2 are used for this zone.

Example Use Cases:

  1. Split-horizon DNS:

    Split-horizon DNS is a technique where different DNS records are returned based on the source IP address of the client. This can be useful for serving different records for internal and external clients.

    Corefile configuration:

    internal.example.com:53 {
    whoami
    acl {
    allow net 10.0.0.0/8
    block
    }
    file /etc/coredns/db.internal.example.com
    }

    external.example.com:53 {
    whoami
    acl {
    allow net 0.0.0.0/0
    }
    file /etc/coredns/db.external.example.com
    }

    In this configuration, we define two zones for internal.example.com and external.example.com. The acl plugin is used to filter clients based on their IP addresses. Internal clients from the 10.0.0.0/8 network can only access internal.example.com, while external clients can access external.example.com.

  2. Custom DNS server with forwarding and caching:

    In this use case, we create a custom DNS server that caches responses, forwards external queries, and serves some local domains.

    Corefile configuration:

    local.example.com:53 {
    file /etc/coredns/db.local.example.com
    errors
    log
    }

    .:53 {
    errors
    health
    cache 300
    forward . 8.8.8.8 8.8.4.4 {
    max_concurrent 1000
    }
    }

    In this example, we define a zone for local.example.com and serve it from a local file. Another zone (.) acts as a catch-all for other queries, caching responses for 300 seconds and forwarding them to Google's DNS servers (8.8.8.8 and 8.8.4.4) with a maximum of 1000 concurrent requests.

  3. CoreDNS with Prometheus monitoring:

    In this use case, we enable Prometheus monitoring for CoreDNS to collect metrics.

    Corefile configuration:

    .:53 {
    errors
    health
    kubernetes cluster.local in-addr.arpa ip6.arpa {
    pods insecure
    fallthrough in-addr.arpa ip6.arpa
    }
    prometheus :9153
    forward . /etc/resolv.conf
    cache 30
    loop
    }

    In this configuration, we define a zone (.) that listens on port 53. The prometheus plugin is enabled to expose metrics on port 9153.

These are just a few examples of what you can achieve using CoreDNS and its versatile Corefile configuration. The extensive list of available plugins allows for a wide range of use cases and customizations.

· 6 min read

The Command and Control (C2) market with respect to fleets of vehicles refers to the technology, software, and services that enable military, government, and commercial organizations to manage and control their fleets of vehicles in real-time.

In this market, C2 systems via HooT API are used to coordinate the movement, positioning, and deployment of vehicles, such as military convoys, emergency response vehicles, commercial fleets, and public transportation. These systems use advanced technologies, such as GPS tracking, internet communication, and integration with collaboration engines to provide situational awareness, decision-making support, and efficient resource allocation.

HooT's API platform with respect to fleets of vehicles includes a range of solutions, from standalone software applications to integrated hardware and software systems. The API can be customized to meet the specific needs of each organization, depending on the size of the fleet, the type of vehicles, the nature of the mission, and the operational environment.

The demand for C2 systems in the fleet management market is driven by the increasing need for efficient and secure vehicle operations, improved situational awareness, and real-time decision-making support. This market is expected to continue growing as the demand for advanced fleet management solutions increases, especially in the military and emergency response sectors.

The HooT Application

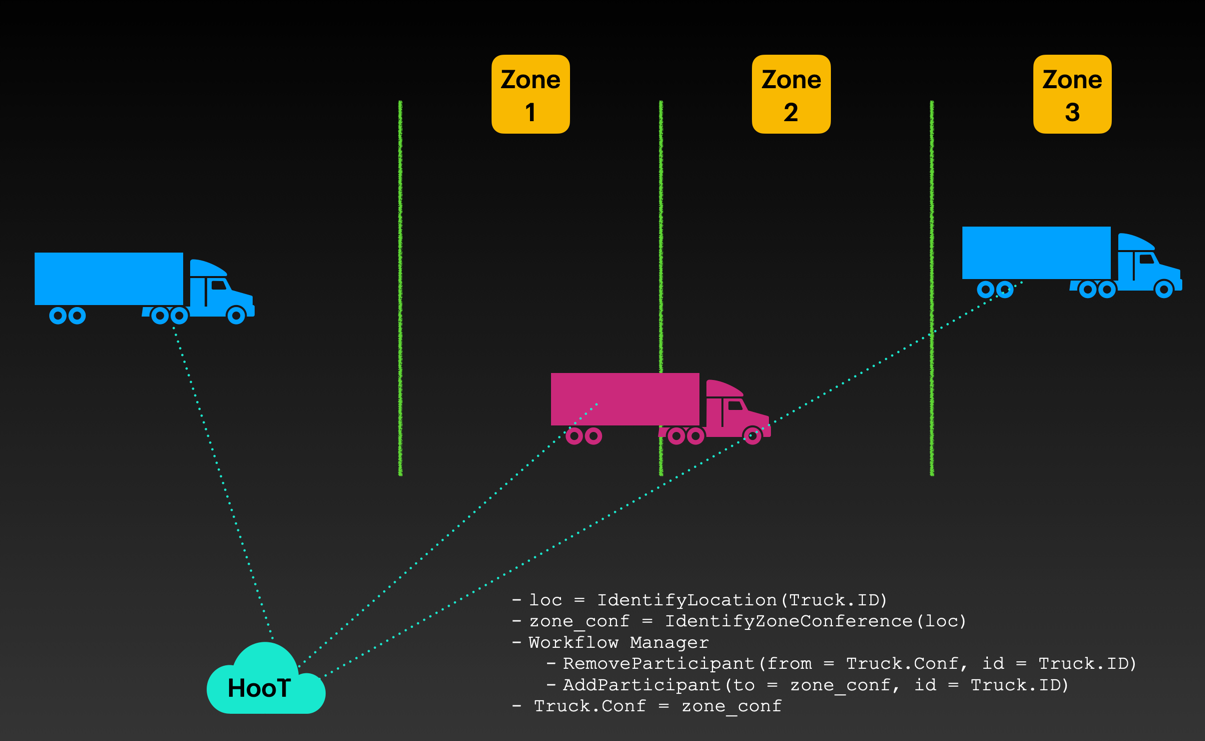
A major fleet management company can automate and relay fleet missions, broadcast alerts, and enable fleet-client communication dynamically with geospatial awareness and realtime information.

Mission

The mission is to send deliveries across a large metropolitan area, while enabling

  • real-time awareness of the current zone
  • update of mission and new workflow adoption
  • client to vehicle communication for any modifications in the plan
  • group communication within fleets
  • point-to-point channel with the vehicle-driver

Delivery of aforementioned workflows can be achieved with an internet-enabled, smart-phone or tablet installed in the vehicle.

Real-time conference switches and awareness

Using CoreLocation in iOS and Geocoder in Android, identifying the location of a vehicle and then pinning it to a contextual travel-zone can be accomplished. Every geographically demarcated travel-zone will have an automatically created conference bridge of it's own.

Upon entering a new zone, the vehicle could automatically join the conference bridge of that zone for real-time mission updates and regional updates.

Sample Code for workflow

Getting the location from device

// Android
import android.Manifest
import android.content.Context
import android.content.pm.PackageManager
import android.location.Location
import androidx.core.app.ActivityCompat
import com.google.android.gms.location.FusedLocationProviderClient
import com.google.android.gms.location.LocationServices

fun getCurrentLocation(context: Context, callback: (Location?) -> Unit) {
val fusedLocationClient: FusedLocationProviderClient = LocationServices.getFusedLocationProviderClient(context)

if (ActivityCompat.checkSelfPermission(context, Manifest.permission.ACCESS_FINE_LOCATION) != PackageManager.PERMISSION_GRANTED) {
// Permission not granted, handle accordingly
callback(null)
return
}

fusedLocationClient.lastLocation.addOnSuccessListener { location: Location? ->
// Got last known location. In some rare situations this can be null.
callback(location)
}
}

Using the location function

getCurrentLocation(this) { location ->
// Do something with the location object
if (location != null) {
val latitude = location.latitude
val longitude = location.longitude
// ...
} else {
// Location is null, handle accordingly
}
}

API for adding/removing from conference

# Remove the truck_id from previous_zone_conf_id
curl -v -H "Authorization: $JWT" \
-X POST --data '{"remove_users": truck_id,..}' \
https://devapi.hoot.mx/v1/edit_conference/{previous_zone_conf_id}

# Add the truck to new_zone_conf_id
curl -v -H "Authorization: $JWT" \
-X POST --data '{"new_participants": truck_id,..}' \
https://devapi.hoot.mx/v1/edit_conference/{new_zone_conf_id}

Mission Updates

  • Live chats can be relayed to all conference users
  • Priority of notifications can be decided by the admin-relayer

Client to Vehicle Communication

During the course of the mission, upcoming milestones can trigger a communication link to the milestone client.

The milestone-client, in case of exceptions and emergencies can join the communication link via web on their mobile devices and communicate about the situation.

Algorithm

  1. Identify next N milestones
  2. Invite the milestone clients to join a unique link to communicate about their situation if they need to.
  3. Remove the links once the milestone is complete.
def milestone_communications(truck, next_communication_size=5):
for milestone in truck.milestones[:next_communication_size]:
truck.send_comm_link(milestone.client_comm_address)

Group Communications and Event Notification

The truck could automatically subscribe to the event-loop using the glayr-api.

All the urgent-communication events would then flash with the name of the relayer on the dashboard of the driver.

Similarly, for the admin to directly communicate with the truck on a private secure channel, they can invoke the API to kickstart the collaboration.

Advanced Usage

Using AI and collaborating with our team of engineers and data-scientists we can create innovative ways to identify certain situations.

One of the use-cases our team came across was to identify distress from conference voice streams.

Goal: Distress Identification from fleet conferences.

  1. We created a model trained to detect distress in voice streams.
  2. We deployed an analyzer to our Kurento media stream
  3. Identified the distress.
import tensorflow as tf
import numpy as np
from kurento.client import KurentoClient, MediaPipeline, MediaElement, MediaPad, WebRtcEndpoint

# Define the TensorFlow model and input/output tensors
model = tf.keras.models.load_model('distress_model.h5')
input_tensor = model.inputs[0]
output_tensor = model.outputs[0]

# Connect to Kurento Media Server
kurento_client = KurentoClient('ws://localhost:8888/kurento')
pipeline = kurento_client.create('MediaPipeline')
webrtc = pipeline.create('WebRtcEndpoint')
webrtc.connect(pipeline)

# Create a GStreamer element that captures the voice stream and feeds it to the TensorFlow model
caps = 'audio/x-raw,format=S16LE,channels=1,layout=interleaved,rate=44100'
src_element = pipeline.create('GstAppSrc', caps=caps)
src_pad = src_element.create_src_pad()
src_element.connect('need-data', on_need_data)

# Define the callback function that processes the voice stream with the TensorFlow model
def on_need_data(src, length):
# Get the voice stream data from the Kurento WebRtcEndpoint
data = webrtc.emit('generate-data-event', length)

# Preprocess the data for the TensorFlow model
audio = np.frombuffer(data, np.int16)
audio = tf.audio.encode_wav(audio, sample_rate=44100)
audio = tf.io.decode_wav(audio.content)[0]
audio = tf.expand_dims(audio, axis=0)

# Pass the data through the TensorFlow model to make a prediction
prediction = model.predict(audio)[0]
if prediction[0] > prediction[1]:
# No distress detected
print('No distress detected')
else:
# Distress detected
print('Distress detected')

This code uses TensorFlow to load a pre-trained model that has been trained to detect distress in voice streams. It then creates a Kurento Media Pipeline and a WebRtcEndpoint. The GStreamer element GstAppSrc is used to capture the voice stream from the WebRtcEndpoint and feed it to the TensorFlow model. The on_need_data callback function is called whenever new data is available, and it processes the data with the TensorFlow model to make a prediction. If the model predicts that distress is present in the voice stream, the callback function outputs a message indicating that distress has been detected.

Note that this is a simple example and that the TensorFlow model used in this code is just a placeholder. In practice, you would need to train a more sophisticated model on a large dataset of distressful voice streams in order to achieve accurate results.

In a future blog we will discuss training voice-distress models in more detail.

· 14 min read

Kurento Media Server (KMS) is an open-source media server that allows developers to build real-time multimedia applications and services. It provides a set of media processing capabilities, including audio and video recording, playback, streaming, and manipulation.

The architecture of Kurento Media Server is based on a modular design that allows it to be easily extended and customized to meet specific requirements. The main components of Kurento Media Server are:

  • Media Processing Elements (MPEs): These are the functional modules that perform the actual media processing tasks, such as encoding, decoding, filtering, and mixing. MPEs can be combined in different ways to create complex media processing pipelines.

  • Pipeline: A pipeline is a logical sequence of MPEs that are connected to form a processing graph. Each MPE in the pipeline processes the media data and passes it on to the next MPE in the sequence.

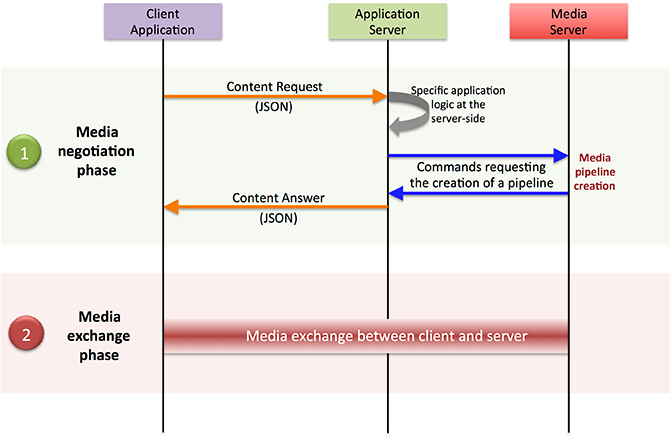
  • WebRTC Signaling: Kurento Media Server uses WebRTC signaling protocols to establish and manage real-time communication sessions between endpoints. The signaling messages are used to negotiate the session parameters, exchange media data, and control the media processing pipeline.

  • Media Server API: Kurento Media Server provides a RESTful API that allows developers to control the media processing pipeline and configure the MPEs. The API also provides access to various media statistics, such as bitrates, frame rates, and packet loss.

  • Media Server Client: The media server client is the end-user application that uses the Kurento Media Server to perform real-time media processing tasks. The client can be a web-based application, a mobile application, or a desktop application.

Overall, the architecture of Kurento Media Server is designed to be flexible and scalable, allowing developers to create customized media processing solutions for a wide range of use cases.

         +-------------------+
| Media Server API |
+-------------------+
| |
| RESTful Interface |
| |
+-------------------+
| |
| Media Processing |
| |
+---------+---------+
|
|
v
+---------+---------+
| Pipeline |
+---------+---------+
|
|
v
+---------+---------+
| Media Processing |
| Element (MPE) |
+---------+---------+
|
|
v
+---------+---------+
| WebRTC Signaling |
+-------------------+

As shown in the diagram, the Media Server API provides a RESTful interface for controlling the media processing pipeline and accessing media statistics. The pipeline consists of a sequence of MPEs that process media data, and the WebRTC Signaling is used to establish and manage real-time communication sessions between endpoints. The Media Server Client interacts with the Media Server API to control the pipeline and perform real-time media processing tasks.

WebRTC Signalling

WebRTC signaling is an essential component of the real-time communication system enabled by Kurento Media Server. It enables endpoints to negotiate and establish communication channels over the internet.

In the context of Kurento Media Server, WebRTC signaling is used to establish and manage real-time communication sessions between endpoints. This includes protocols like SDP (Session Description Protocol) and ICE (Interactive Connectivity Establishment).

Here's how WebRTC signaling works within Kurento Media Server:

  • WebRTC Offer/Answer: When an endpoint wants to establish a WebRTC session with another endpoint, it sends an offer message that includes information about its capabilities, such as the codecs it supports, and the transport protocols it can use. The other endpoint responds with an answer message that includes its capabilities.

  • ICE Candidates: Once the endpoints have exchanged offer and answer messages, they need to determine the best network path to use for the communication session. Each endpoint generates a list of ICE candidates, which are potential network paths that can be used for communication. The endpoints exchange these ICE candidates and use them to establish a direct peer-to-peer connection.

  • SDP Negotiation: Once the endpoints have established a direct connection, they use the Session Description Protocol (SDP) to negotiate the details of the communication session. This includes the media types (e.g., audio or video), the codecs, and the transport protocols to be used for each media type.

  • Media Pipeline: Once the SDP negotiation is complete, Kurento Media Server sets up a media processing pipeline based on the negotiated parameters. The pipeline consists of a sequence of Media Processing Elements (MPEs) that process the media data, such as encoding, decoding, filtering, and mixing.

  • Real-time Communication: With the media pipeline in place, the endpoints can start to exchange media data in real-time, using the agreed-upon media formats and protocols.

In summary, WebRTC signaling within Kurento Media Server is used to establish and manage real-time communication sessions between endpoints. It enables endpoints to negotiate the details of the communication session, determine the best network path, and establish a direct peer-to-peer connection. Once the connection is established, Kurento Media Server sets up a media processing pipeline that processes the media data in real-time.

              Endpoint A                  Endpoint B
| |
| |
| |
(1) Offer SDP (2) Answer SDP
| |
| |
| |
+--------------+--------------+ +--------------+--------------+
| | | |
| (3) ICE Candidate Exchange | | (3) ICE Candidate Exchange |
| | | |
+--------------+--------------+ +--------------+--------------+
| |
| |
| |
(4) SDP Negotiation (4) SDP Negotiation
| |
| |
| |
+--------------+--------------+ +--------------+--------------+
| | | |
| (5) Real-time | | (5) Real-time |
| Communication Begins | | Communication Begins |
| | | |
+------------------------------+ +------------------------------+

The diagram shows two endpoints, A and B, that want to establish a WebRTC communication session using Kurento Media Server. Here's how the signaling process works:

  • Endpoint A sends an Offer SDP message to Kurento Media Server, which includes information about its capabilities, such as the codecs it supports, and the transport protocols it can use.
  • Kurento Media Server forwards the Offer SDP message to Endpoint B, which responds with an Answer SDP message that includes its capabilities.
  • Endpoint A and Endpoint B exchange ICE candidates, which are potential network paths that can be used for communication. The ICE candidates are used to determine the best network path for the communication session.
  • Endpoint A and Endpoint B negotiate the details of the communication session using SDP. They agree on the media types (e.g., audio or video), the codecs, and the transport protocols to be used for each media type.
  • With the communication parameters negotiated, real-time communication begins between Endpoint A and Endpoint B. Media data is exchanged using the agreed-upon media formats and protocols. In summary, WebRTC signaling within Kurento Media Server enables endpoints to negotiate and establish real-time communication sessions, using protocols like SDP and ICE. The signaling process ensures that the endpoints agree on the media formats, codecs, and transport protocols to be used for the communication session, and establish a direct peer-to-peer connection for efficient data transfer.

architecture

ICE Candidates

In WebRTC, Interactive Connectivity Establishment (ICE) is used to establish a direct peer-to-peer connection between endpoints, which is necessary for real-time communication. ICE candidates are network addresses that are used by ICE to establish a direct connection between endpoints.

In WebRTC, there are two types of ICE candidates: host candidates and server-reflexive candidates.

  • Host Candidates: A host candidate is an IP address and port number associated with the device where the endpoint is running. These are local network addresses of the endpoint's machine that can be used for direct communication if both endpoints are on the same network.

  • Server-Reflexive Candidates: Server-reflexive candidates are network addresses that are obtained by sending a request to a STUN (Session Traversal Utilities for NAT) server. These candidates are obtained by using a NAT traversal technique that allows the endpoint to determine its public IP address and port number, which can be used for communication with endpoints outside of its local network.

To determine the ICE candidates, WebRTC endpoints perform a series of steps:

  • Each endpoint collects a list of its local IP addresses and ports. These are the host candidates.

  • Each endpoint sends a STUN request to a STUN server. The STUN server responds with a server-reflexive candidate, which includes the public IP address and port number of the endpoint.

  • If the endpoints are unable to establish a direct connection using host and server-reflexive candidates, they may also use other types of candidates such as relay candidates, which are obtained by using a TURN (Traversal Using Relay NAT) server.

  • The endpoints exchange their list of ICE candidates over the signaling channel and use them to establish a direct connection.

The ICE negotiation process continues until a direct connection is established between the endpoints or until all candidate types have been exhausted. The ICE negotiation process is important for WebRTC communication because it allows endpoints to establish a direct connection even when they are behind firewalls and NATs that would otherwise prevent direct communication.

Configuring ICE

To configure ICE candidates in Kurento Media Server, you typically follow these steps:

  • Collect the local IP addresses and ports that can be used as ICE candidates for the WebRTC endpoint.

  • Create an IceCandidate object for each candidate, specifying the candidate's transport protocol, IP address, port number, and any other relevant properties.

  • Add the IceCandidate objects to the WebRTC endpoint's WebRtcEndpoint using the addIceCandidate method.

  • Wait for the remote endpoint to send its SDP offer, which includes its own ICE candidates.

  • Process the remote endpoint's SDP offer to determine its ICE candidates.

  • Add the remote endpoint's ICE candidates to the WebRTC endpoint's WebRtcEndpoint using the addIceCandidate method.

  • Start the ICE connectivity checks between the endpoints to determine the best candidate pair for establishing a direct connection.

// Create a new IceCandidate object with the candidate properties
IceCandidate candidate = new IceCandidate.Builder()
.withFoundation("foundation")
.withComponentId(1)
.withTransport("UDP")
.withPriority(12345678)
.withIp("192.168.1.100")
.withPort(1234)
.withType(CandidateType.HOST)
.withGeneration(0)
.build();

// Get the WebRtcEndpoint to which the IceCandidate will be added
WebRtcEndpoint webRtcEndpoint = ...;

// Add the IceCandidate to the WebRtcEndpoint
webRtcEndpoint.addIceCandidate(candidate);

Bandwidth Management within KMS

Bandwidth management and configuration is an important aspect of optimizing the performance of media streams in Kurento Media Server. Kurento provides several mechanisms to manage bandwidth usage, including:

  1. Bitrate Adaptation: Kurento can automatically adjust the bitrate of media streams based on network conditions and available bandwidth. This can help improve the quality of media while avoiding congestion and packet loss.

  2. Dynamic Bandwidth Allocation: Kurento can allocate bandwidth dynamically to media streams based on their priority, size, and other parameters. This can help ensure that critical media streams receive sufficient bandwidth while minimizing the impact on other streams.

  3. Congestion Control: Kurento can detect and respond to network congestion by reducing the bitrate of media streams or dropping packets selectively. This can help prevent network overload and improve overall performance.

To configure bandwidth management in Kurento Media Server, you can use the following settings:

  • maxOutputBitrate: This property sets the maximum output bitrate that can be used by media streams in Kurento. It can be set globally or for individual media elements and endpoints.

  • minOutputBitrate: This property sets the minimum output bitrate that should be used by media streams in Kurento. It can be used to ensure that media streams maintain a minimum quality level even in low bandwidth conditions.

  • adaptationSet: This property configures the bitrate adaptation algorithm used by Kurento. It can be set to different values, such as "fixed", "fluid", or "manual", depending on the desired behavior.

  • priority: This property sets the priority of individual media streams in Kurento. Higher priority streams will receive more bandwidth allocation and higher quality.

Example of configuring bandwidth using Kurento API

from kurento_client import KurentoClient, MediaPipeline, WebRtcEndpoint

# Create a Kurento Client object
kurento_client = KurentoClient('ws://localhost:8888/kurento')

# Create a new media pipeline
pipeline = kurento_client.create('MediaPipeline')

# Create a WebRTC endpoint and connect it to the pipeline
webrtc = WebRtcEndpoint.Builder(pipeline).build()
webrtc.connect(webrtc)

# Configure bandwidth management settings
webrtc.set_max_output_bitrate(1000) # Set max output bitrate to 1000 kbps
webrtc.set_min_output_bitrate(500) # Set min output bitrate to 500 kbps
webrtc.set_priority(1) # Set priority to 1

# Start the media pipeline and WebRTC endpoint
pipeline.play()
webrtc.gather_candidates()

# Use the WebRTC endpoint to transmit and receive media

Media Profile in Kurento

Example - configuring media profiles in KMS

import org.kurento.client.*;
import org.kurento.client.MediaProfileSpecType;
import org.kurento.client.MediaProfileSpec;

// Create a new media pipeline
MediaPipeline pipeline = kurento.createMediaPipeline();

// Create a new WebRTC endpoint and connect it to the pipeline
WebRtcEndpoint webrtc = new WebRtcEndpoint.Builder(pipeline).build();
webrtc.connect(webrtc);

// Configure media profile settings
MediaProfileSpec mediaProfile = new MediaProfileSpec.Builder()
.withVideoCodec(VideoCodec.H264)
.withAudioCodec(AudioCodec.OPUS)
.withTransport(Transport.TCP)
.withMediaType(MediaProfileSpecType.WEBM)
.withMaxVideoBitrate(2000)
.withMaxAudioBitrate(128)
.withMinVideoBitrate(1000)
.withMinAudioBitrate(64)
.build();
webrtc.setMediaProfile(mediaProfile);

// Start the media pipeline and WebRTC endpoint
pipeline.play();
webrtc.gatherCandidates();

// Use the WebRTC endpoint to transmit and receive media

Analytics in KMS

Kurento Media Server supports integration with different analytics tools, such as monitoring systems, data processing platforms, and machine learning models.

from kurento_client import KurentoClient, MediaPipeline, MediaElement

# Create a Kurento client instance
kurento_client = KurentoClient('ws://<your-kms-address>:8888/kurento')

# Create a media pipeline
pipeline = kurento_client.create('MediaPipeline')

# Create a media element, for example a WebRTC endpoint
webrtc = pipeline.create('WebRtcEndpoint')

# Enable gathering of stats for the endpoint
webrtc.enable_stats_events('EndpointStats')

# Connect the endpoint to other media elements in the pipeline
# ...

# Start the pipeline
pipeline.play()

# Get stats for the endpoint
stats = webrtc.get_stats()

# Process the stats
# ...

# Release resources
webrtc.release()
pipeline.release()
kurento_client.close()

Use Case Studies

AI Based QoS in KMS

AI-based Quality of Service (QoS): Kurento can be integrated with AI algorithms to monitor and optimize the QoS of media streams. AI-based QoS algorithms can automatically adjust the media stream parameters such as resolution, bitrate, frame rate, and more based on network conditions, device capabilities, and user preferences.

Example of AI based QoS with Tensorflow

from kurento_client import MediaPipeline, WebRtcEndpoint
import tensorflow as tf

class AIQoS:
def __init__(self, pipeline: MediaPipeline, webrtc: WebRtcEndpoint):
self.pipeline = pipeline
self.webrtc = webrtc
self.sess = tf.Session()
self.graph = self.build_graph()
self.qos = self.graph.get_tensor_by_name('qos:0')

def build_graph(self):
graph = tf.Graph()
with graph.as_default():
input_tensor = tf.placeholder(tf.float32, shape=[None, 2])
output_tensor = tf.layers.dense(input_tensor, 1, activation=tf.sigmoid, name='qos')
return graph

def adjust_qos(self, bandwidth: float):
input_data = [[self.webrtc.getMeasuredLatency(), bandwidth]]
qos_value = self.sess.run(self.qos, feed_dict={self.graph.get_tensor_by_name('Placeholder:0'): input_data})
self.webrtc.setVideoMaxBandwidth(qos_value * bandwidth)

Speech Recognition & NLP using KMS

Machine Learning (ML) based image and speech recognition: Kurento can be integrated with ML libraries such as TensorFlow, Keras or OpenCV to perform tasks such as object detection, facial recognition, emotion detection, speech recognition, and more. Kurento can process media streams and provide results to the ML algorithms, which can then provide intelligent insights.

Natural Language Processing (NLP): Kurento can be integrated with NLP libraries such as NLTK or spaCy to perform tasks such as sentiment analysis, topic extraction, entity recognition, and more. Kurento can provide the audio or text data to NLP algorithms and receive intelligent insights.

Example KMS integration with Google Cloud Speech-to-Text API.

from google.cloud import speech
import kurento_client

class SpeechRecognition:
def __init__(self, pipeline: kurento_client.MediaPipeline, webrtc: kurento_client.WebRtcEndpoint, language_code: str):
self.pipeline = pipeline
self.webrtc = webrtc
self.language_code = language_code
self.client = speech.SpeechClient()
self.streaming_config = speech.StreamingRecognitionConfig(
config=speech.RecognitionConfig(
encoding=speech.RecognitionConfig.AudioEncoding.OPUS,
sample_rate_hertz=48000,
language_code=language_code,
model='default'
),
interim_results=True
)
self.recognize_stream = self.client.streaming_recognize(self.streaming_config)

def on_sdp_offer(self, offer, on_response):
answer = offer
answer.sdp = self.webrtc.process_offer(offer.sdp)
on_response(answer)

def on_ice_candidate(self, candidate):
self.webrtc.add_ice_candidate(candidate)

def start_recognition(self):
self.webrtc.connect(self.pipeline)
self.pipeline.play()
self.webrtc.gatherCandidates()

for chunk in self.webrtc.get_media_element().connect(self.pipeline).pull():
if not self.webrtc.get_media_element().is_paused():
self.recognize_stream.write(chunk)

self.recognize_stream.close()

for response in self.recognize_stream:
for result in response.results:
if result.is_final:
print(result.alternatives[0].transcript)
else:
print(result.alternatives[0].transcript, end='')

Example: using the SpeechRecognition class

import kurento_client
import sys
import time

kurento_client.KurentoClient.register_modules('kurento.modules.webRtcEndpoint', 'kmsserver.kurento')

pipeline = kurento_client.MediaPipeline()

webrtc = kurento_client.WebRtcEndpoint.Builder(pipeline).build()

speech_recognition = SpeechRecognition(pipeline, webrtc, 'en-US')

@speech_recognition.on('sdp_offer')
def on_sdp_offer(offer):
print('Received SDP offer')
answer = None
speech_recognition.on_sdp_offer(offer, lambda a: nonlocal answer; answer = a)
return answer

@speech_recognition.on('ice_candidate')
def on_ice_candidate(candidate):
print('Received ICE candidate')
speech_recognition.on_ice_candidate(candidate)

speech_recognition.start_recognition()

webrtc.connect(webrtc)

with open(sys.argv[1], 'rb') as f:
while True:
chunk = f.read(960)
if not chunk:
break
webrtc.send_data(chunk)
time.sleep(0.01)

webrtc.disconnect(webrtc)

pipeline.release()

· 13 min read

UCAAS stands for Unified Communications as a Service. It is a cloud-based delivery model for enterprise communications applications, such as voice, video, messaging, and collaboration tools.

UCaaS enables businesses to access a suite of communication and collaboration tools through the internet, rather than deploying and maintaining their own hardware and software. This means that businesses can quickly and easily scale their communication capabilities up or down depending on their needs, without the need for significant capital expenditures or IT resources.

UCaaS also provides greater flexibility for remote and mobile workers, as they can access the same communication tools as in-office workers from anywhere with an internet connection. This can improve productivity and collaboration within teams, as well as with customers and partners.

UCAAS

Technology Landscape in UCaaS

UCaaS (Unified Communications as a Service) utilizes a variety of technologies to enable communication and collaboration. Here are some of the key technologies that are commonly used in UCaaS:

  • Voice over Internet Protocol (VoIP): VoIP is a technology that enables voice calls over the internet, rather than using traditional phone lines. UCaaS providers often use VoIP to provide voice communication services to their customers.

  • Session Initiation Protocol (SIP): SIP is a signaling protocol used to establish and manage communication sessions in UCaaS. It enables features such as call forwarding, conferencing, and call transfer.

  • Web Real-Time Communication (WebRTC): WebRTC is a browser-based technology that allows audio and video communication to take place directly between browsers, without the need for any additional software or plugins. UCaaS providers may use WebRTC to enable browser-based video conferencing and other real-time communication features.

  • Instant Messaging (IM): IM is a technology that allows users to send real-time text messages to one another. UCaaS providers may include IM as part of their collaboration tools, allowing users to chat with each other in real-time.

  • Presence: Presence technology allows users to see the status of other users in real-time, indicating whether they are available, busy, or away. Presence is often used in UCaaS to enable more effective collaboration and communication between team members.

  • Cloud Computing: UCaaS is delivered through the cloud, which allows users to access communication and collaboration tools from anywhere with an internet connection. Cloud computing also enables UCaaS providers to offer flexible and scalable services to their customers.

Security In UCaaS

Security is a critical consideration for any UCaaS (Unified Communications as a Service) deployment. Here are some of the key security measures that are commonly used in UCaaS:

  • Encryption: UCaaS providers often use encryption to protect communication and collaboration tools from unauthorized access. Encryption can prevent eavesdropping, data theft, and other security threats by encoding data in transit and at rest.

  • Authentication: UCaaS providers often use authentication methods such as passwords, multi-factor authentication (MFA), and single sign-on (SSO) to verify the identity of users accessing communication and collaboration tools. This can help prevent unauthorized access and data breaches.

  • Network Security: UCaaS providers often use network security measures such as firewalls, intrusion detection and prevention systems (IDS/IPS), and virtual private networks (VPNs) to protect against unauthorized access and other security threats.

  • Data Backup and Recovery: UCaaS providers often implement backup and recovery solutions to protect against data loss due to natural disasters, hardware failures, and other unforeseen events.

  • Compliance: UCaaS providers may comply with various security and privacy regulations such as HIPAA, GDPR, and PCI DSS, depending on the industry and jurisdiction. Compliance helps ensure that UCaaS providers are taking appropriate measures to protect their customers' data.

  • User Education and Awareness: UCaaS providers often educate users about security best practices, such as strong passwords, avoiding phishing emails, and protecting sensitive data. This can help reduce the risk of security breaches caused by user error or negligence.

HooT as UCaaS

HooT.mx uses WebRTC (Web Real-Time Communication) to provide real-time audio and video conferencing capabilities in its web conferencing system. WebRTC is a browser-based technology that enables audio and video communication to take place directly between browsers, without the need for any additional software or plugins.

HooT.mx implements WebRTC through a variety of technologies and protocols, including:

  • Signaling Server: HooT.mx uses a signaling server to facilitate communication between browsers. The signaling server is responsible for exchanging session descriptions, candidate addresses, and other metadata between browsers to establish a connection.

  • TURN Server: HooT.mx uses a TURN (Traversal Using Relays around NAT) server to enable communication between browsers that are behind firewalls or NATs (Network Address Translators). The TURN server relays traffic between browsers to enable them to communicate even if they cannot connect directly.

  • STUN Server: HooT.mx uses a STUN (Session Traversal Utilities for NAT) server to discover the public IP address and port of a browser. This information is necessary to establish a direct peer-to-peer connection between browsers when possible, rather than using the TURN server as an intermediary.

  • WebSockets: HooT.mx uses WebSockets to enable real-time communication between browsers and the server. WebSockets provide a bidirectional communication channel between the browser and the server, allowing for real-time updates and messages to be exchanged.

Together, these technologies enable HooT.mx to provide real-time audio and video conferencing capabilities through the browser. Users can join a meeting simply by clicking a link and using their browser, without the need for any additional software or plugins.

Exploring the Architecture of HooT.mx

The architecture of HooT.mx is designed to provide a scalable, modular, and extensible web conferencing system that can handle large online classrooms and meetings. Here are the main components of the architecture:

  1. Client-side: HooT.mx's client-side architecture is based on HTML5 and JavaScript. This enables users to join a meeting using a web browser without the need for any additional software or plugins.

  2. Web Server: HooT.mx's web server is built using the Play Framework, a web application framework written in Java. The web server provides the main interface for users to interact with the system, including joining meetings, creating breakout rooms, sharing content, and more.

  3. Video Server: The video server is responsible for processing and distributing audio and video streams to meeting participants. It uses open source media servers such as Kurento and Jitsi to provide real-time audio and video conferencing.

  4. Recording Server: HooT.mx's recording server is responsible for recording meetings and making them available for playback at a later time. It uses the open source HTML5-based player, which can play back recordings on any device that supports HTML5.

  5. Database: HooT.mx's database stores all the metadata related to meetings, users, recordings, and other system components. It uses a SQL database to store this information.

  6. Application Programming Interfaces (APIs): HooT.mx provides a set of APIs that enable developers to build custom applications and integrations. These APIs include the REST API, which provides programmatic access to the system's functionality, and the Events API, which enables developers to receive real-time updates on system events.

  7. Plugins: HooT.mx's architecture also supports a wide range of plugins that extend the system's functionality. These plugins can be developed by the community or by third-party developers, and can be used to add features such as polling, closed captioning, and more.

Overall, the architecture of HooT.mx is designed to provide a flexible and extensible platform for online learning and collaboration. Its modular design and open APIs enable developers to build custom integrations and extend the functionality of the system as needed.

Hello World of WebRTC & VoIP

This code creates a WebRTC Peer Connection object and adds an audio stream to it. It then creates a data channel for text chat.

When the user clicks the "call" button, the code creates a new remote Peer Connection, adds an audio stream to it, and listens for incoming text messages on the data channel. The code then exchanges SDP descriptions between the two Peer Connections to establish the VoIP communication.

The user can send text messages by typing them into the chat box and clicking the "send" button. The messages are sent over the data channel.

// Create a WebRTC Peer Connection object
const peerConnection = new RTCPeerConnection();

// Add audio stream to the Peer Connection
const localStream = await navigator.mediaDevices.getUserMedia({audio: true});
localStream.getTracks().forEach(track => peerConnection.addTrack(track, localStream));

// Create a data channel for text chat
const dataChannel = peerConnection.createDataChannel('chat', { ordered: true });

// Set up VoIP communication using WebRTC
const callButton = document.getElementById('call-button');
callButton.addEventListener('click', () => {
const remotePeer = new RTCPeerConnection();

// Add audio stream to the remote Peer Connection
remotePeer.addEventListener('track', event => {
const remoteAudio = document.getElementById('remote-audio');
remoteAudio.srcObject = event.streams[0];
});

// Receive text messages through the data channel
remotePeer.addEventListener('datachannel', event => {
const dataChannel = event.channel;
dataChannel.addEventListener('message', message => {
const chatBox = document.getElementById('chat-box');
chatBox.value += message.data;
});
});

// Exchange SDP descriptions
peerConnection.createOffer().then(offer => {
peerConnection.setLocalDescription(offer);
remotePeer.setRemoteDescription(offer);
remotePeer.createAnswer().then(answer => {
remotePeer.setLocalDescription(answer);
peerConnection.setRemoteDescription(answer);
});
});
});

// Send text messages through the data channel
const chatBox = document.getElementById('chat-box');
const sendButton = document.getElementById('send-button');
sendButton.addEventListener('click', () => {
const message = chatBox.value;
dataChannel.send(message);
});

Kurento Media Server in more detail

Kurento is an open-source media server that is designed to work with WebRTC (Web Real-Time Communication) to enable real-time audio and video communication in web applications. Kurento is built using Java, and it provides a variety of modules and APIs that enable developers to add advanced multimedia features to their web applications.

Here's how Kurento Media server works with WebRTC:

  • Signaling: When two or more web clients want to establish a connection, they need to exchange signaling messages to negotiate the connection. Kurento provides a signaling server that can handle this process and ensure that the clients can establish a connection.

  • WebRTC APIs: Kurento provides APIs for WebRTC, which enable developers to create multimedia web applications that can handle real-time audio and video communication.

  • Media Processing: Kurento is designed to process media streams in real-time. It can perform a variety of operations on media streams, such as encoding, decoding, filtering, and mixing. These operations can be used to modify or enhance media streams in various ways.

  • Media Pipeline: Kurento uses a media pipeline to process media streams. A media pipeline is a sequence of modules that are connected to each other. Each module performs a specific media processing task, and the output of one module is fed into the input of the next module in the pipeline.

  • WebRTC Endpoints: Kurento provides WebRTC endpoints that enable clients to connect to the media pipeline. These endpoints can be used to send and receive media streams, and they can be customized to add various multimedia features to the web application.

Overall, Kurento Media server provides a powerful set of tools and APIs that enable developers to create multimedia web applications with advanced features. Its integration with WebRTC makes it an ideal choice for web applications that require real-time audio and video communication, such as video conferencing, live streaming, and online gaming.

Configuring Kurento

Configuring Kurento Media Server for optimal performance can be a complex process, as it depends on various factors such as the hardware and network environment, the types of media streams being processed, and the specific use case of the application. However, here are some general guidelines that can help optimize the performance of Kurento Media Server:

  • Hardware and Network Environment: Kurento Media Server's performance is affected by the hardware and network environment it runs on. To optimize performance, it is recommended to use a server with high CPU, RAM, and network bandwidth. Kurento Media Server should also be installed on a dedicated server to avoid resource contention with other applications.

  • Use Efficient Codecs: Kurento Media Server supports a variety of audio and video codecs. To optimize performance, it is recommended to use efficient codecs that provide high quality at low bitrates. Some examples of efficient codecs are Opus for audio and VP9 for video.

  • Optimize Media Pipeline: Kurento Media Server's media pipeline can be optimized for performance by reducing the number of modules used, minimizing the number of media streams being processed, and avoiding unnecessary media processing operations.

  • Use Caching: Kurento Media Server provides caching mechanisms that can be used to store frequently accessed media streams in memory. This can help reduce the load on the server and improve performance.

  • Load Balancing: To handle high traffic, multiple instances of Kurento Media Server can be deployed and load balanced using a load balancer. This helps distribute the load across multiple servers and ensures that each server is operating at optimal capacity.

  • Monitoring and Optimization: Kurento Media Server provides various monitoring tools that can be used to monitor the performance of the system. These tools can be used to identify bottlenecks and optimize the system accordingly.

Overall, configuring Kurento Media Server for performance requires a deep understanding of the system's architecture and performance characteristics. By following the above guidelines and continuously monitoring and optimizing the system, it is possible to achieve optimal performance and provide a seamless multimedia experience to users.

Codecs supported by Kurento

Kurento Media Server supports a wide range of codecs for audio and video streams. Here are some of the codecs supported by Kurento:

Audio Codecs:

  • Opus
  • G.711
  • G.722
  • AAC
  • MP3
  • PCM

Video Codecs:

  • VP8
  • VP9
  • H.264
  • H.265
  • MPEG-4
  • Theora

Kurento also supports several image and data codecs, such as JPEG, PNG, and JSON. Additionally, Kurento supports transcoding, which enables the server to convert media streams from one format to another, depending on the client's capabilities.

Sample code for using Kurento Media Server to process a video stream

// This code creates a Kurento Media Pipeline and adds a GStreamerFilter to flip the video horizontally. Two WebRTC endpoints are then created, one for the video input and one for the output. The filter is connected between the two endpoints to process the video stream.
// The code then generates an SDP offer and sends it to a remote peer, which sends back an SDP answer. The local WebRTC endpoint then sets the SDP answer and starts sending and receiving video.


const kurentoClient = require('kurento-client');
const kurentoMediaPipeline = await kurentoClient.create('MediaPipeline');

// Create WebRTC endpoint for video input
const webRtcEndpoint = await kurentoMediaPipeline.create('WebRtcEndpoint');

// Add filter to process the video stream
const filter = await kurentoMediaPipeline.create('GStreamerFilter', { command: 'videoflip method=horizontal-flip' });
await webRtcEndpoint.connect(filter);

// Create WebRTC endpoint for video output
const webRtcEndpoint2 = await kurentoMediaPipeline.create('WebRtcEndpoint');
await filter.connect(webRtcEndpoint2);

// Start processing the video stream
await webRtcEndpoint.gatherCandidates();
await webRtcEndpoint2.gatherCandidates();

// Offer the SDP description to the remote peer
const offer = await webRtcEndpoint.generateOffer();
// Send the offer to the remote peer and receive the answer
const answer = await remotePeer.processOffer(offer.sdp);
// Set the SDP answer on the local WebRTC endpoint
await webRtcEndpoint2.processAnswer(answer.sdp);

// Start sending and receiving video
await webRtcEndpoint2.connect(webRtcEndpoint);
await webRtcEndpoint.connect(webRtcEndpoint2);

· 10 min read

HooT uses OpenID Connect for Authentication & Authorization.

OpenID Connect (OIDC) is an authentication protocol that is built on top of OAuth 2.0. It allows for the authentication of users by using JSON Web Tokens (JWTs) to transmit identity information between an identity provider (IdP) and a client application.

In OIDC, the client application initiates the authentication request by redirecting the user to the IdP. The user then authenticates with the IdP, which then returns a JWT containing information about the user to the client application. The client application can then use this JWT to authenticate the user for subsequent requests.

OIDC is designed to be a simple and secure authentication protocol that is easy to implement and use. It also provides features such as session management, allowing users to remain authenticated across multiple applications, and support for multi-factor authentication, providing an additional layer of security for user authentication.

API Authentication

API authentication using OpenID Connect is a popular approach to securing APIs. OpenID Connect is a simple identity layer built on top of the OAuth 2.0 protocol, and it provides a standard way for clients to authenticate users and obtain their profile information.

To use OpenID Connect for API authentication, you would typically follow these steps:

  1. Configure your API to require authentication using OpenID Connect. This can typically be done by adding an authentication middleware to your API's request pipeline.

  2. Configure an OpenID Connect provider (such as Auth0) to issue access tokens that can be used to authenticate requests to your API. You'll typically need to register your API with the provider and configure some settings to indicate which scopes and permissions are required for accessing your API.

  3. When a client makes a request to your API, it must include an access token in the Authorization header of the request. This token is obtained by authenticating the user via the OpenID Connect provider and obtaining an access token from the provider's token endpoint.

  4. Your API should validate the access token to ensure that it is valid and has the required scopes and permissions to access the requested resource.

  5. If the access token is valid, your API should process the request and return the appropriate response.

Overall, using OpenID Connect for API authentication can provide a secure and scalable way to protect your APIs and ensure that only authorized clients can access them.

Client Credentials for System Accounts

In OpenID Connect (OIDC), client credentials are a type of OAuth 2.0 client authentication mechanism that can be used to obtain an access token for a client application without involving a user.

When using client credentials, the client application sends a request to the authorization server (or OIDC provider) with its own client identifier and client secret. The authorization server then verifies the credentials and issues an access token to the client application.

Client credentials can be used in a variety of scenarios, such as when a client application needs to access resources on behalf of itself (rather than a user), or when a client application needs to access a protected resource that doesn't require user consent (such as a public API).

To use client credentials with OIDC, the client application must be registered with the authorization server and have a client identifier and client secret. The client application then sends a token request to the authorization server's token endpoint with the following parameters:

grant_type=client_credentials
client_id= (the client identifier)
client_secret= (the client secret)
scope= (optional scope requested by the client application)

The authorization server then responds with an access token that can be used to access the requested resources.

It's important to note that client credentials are not intended to be used as a replacement for user-based authentication. Client applications should only use client credentials when they need to access resources on behalf of themselves and not on behalf of a user.

Golang Code Sample for Client Credential Generation

package main

import (
"bytes"
"encoding/json"
"net/http"
)

func main() {
// Set up the request parameters
clientID := "<your_client_id>"
clientSecret := "<your_client_secret>"
audience := "<your_api_audience>"
tokenURL := "https://<your_auth0_domain>/oauth/token"

// Build the request body
requestBody, err := json.Marshal(map[string]string{
"client_id": clientID,
"client_secret": clientSecret,
"audience": audience,
"grant_type": "client_credentials",
})
if err != nil {
panic(err)
}

// Send the request to the token endpoint
response, err := http.Post(tokenURL, "application/json", bytes.NewBuffer(requestBody))
if err != nil {
panic(err)
}
defer response.Body.Close()

// Parse the response body into a map
var responseBody map[string]interface{}
err = json.NewDecoder(response.Body).Decode(&responseBody)
if err != nil {
panic(err)
}

// Extract the access token from the response
accessToken := responseBody["access_token"].(string)
useAcceessToken(accessToken)

// Use the access token to make requests to your API
// ...
}

func useAcceessToken(token string) {

}

Python Code Sample for Client Credential Generation

import requests
import json

client_id = '<your_client_id>'
client_secret = '<your_client_secret>'
audience = '<your_api_audience>'
token_url = 'https://<your_auth0_domain>/oauth/token'

# Build the request body
payload = {
'client_id': client_id,
'client_secret': client_secret,
'audience': audience,
'grant_type': 'client_credentials'
}
headers = {'content-type': 'application/json'}

# Send the request to the token endpoint
response = requests.post(token_url, data=json.dumps(payload), headers=headers)
response.raise_for_status()

# Extract the access token from the response
access_token = response.json()['access_token']

# Use the access token to make requests to your API
# ...

Auth0

Auth0 is a cloud-based authentication and authorization service that enables developers to easily implement secure user authentication and authorization in their applications. It provides features such as single sign-on (SSO), multifactor authentication (MFA), social login, and user management.

With Auth0, developers can integrate authentication and authorization capabilities into their applications using standard protocols such as OAuth 2.0, OpenID Connect, and SAML. Auth0 also provides libraries and SDKs for various programming languages and frameworks to make integration easier.

Auth0 is designed to be flexible and customizable, allowing developers to implement authentication and authorization in a way that meets their specific needs. It also provides analytics and reporting features to help developers understand how users are interacting with their applications.

Auth0 is used by thousands of companies and organizations, from startups to large enterprises, across a wide range of industries.

Attack prevention using Auth0

Auth0 provides several security features that can help prevent attacks on your application, such as:

  1. Multi-Factor Authentication (MFA): Auth0 supports various forms of MFA, including email, SMS, and authenticator apps. By requiring users to provide a second factor of authentication, you can greatly reduce the risk of unauthorized access.

  2. IP Address Allowlisting and Denylisting: You can configure your Auth0 tenant to allow-list or deny-list specific IP addresses, helping to prevent unauthorized access from specific locations.

  3. Brute-Force Protection: Auth0 provides built-in protection against brute-force attacks by limiting the number of failed login attempts and locking out users who exceed this threshold.

  4. Password Policies: You can configure password policies in Auth0 to enforce strong passwords and prevent common password attacks, such as dictionary attacks.

  5. Token Expiration and Revocation: Auth0 tokens have a built-in expiration time, and you can also revoke tokens manually if necessary. This helps prevent unauthorized access if a token is lost or stolen.

  6. Suspicious Activity Detection: Auth0 monitors login activity and can detect suspicious behavior, such as login attempts from unusual locations or multiple failed login attempts from the same user.

  7. Custom Rules: Auth0 allows you to create custom rules that can perform additional security checks, such as verifying the user's IP address or checking for known malicious behavior.

In addition to these features, Auth0 also provides regular security updates and patches to help prevent new and emerging security threats. It's important to keep your Auth0 configuration up to date and follow security best practices to ensure the highest level of security for your application.

Suspicious Activity Detection

Auth0 uses various mechanisms to detect suspicious activity and help prevent unauthorized access to your application. Here are some ways in which Auth0 detects suspicious activity:

Abnormal Behavior Detection: Auth0 monitors login activity and uses machine learning algorithms to detect abnormal behavior, such as login attempts from unusual locations, IP addresses, or devices.

  1. IP Anomaly Detection: Auth0 uses IP anomaly detection to identify and flag IP addresses that show signs of suspicious activity, such as a high volume of failed login attempts or unusual patterns of behavior.

  2. Rate Limiting: Auth0 enforces rate limiting to prevent brute-force attacks by limiting the number of failed login attempts from a single IP address.

  3. User Behavioral Analysis: Auth0 analyzes user behavior to detect suspicious activity, such as multiple failed login attempts, login attempts at unusual times of day, or attempts to access protected resources without proper authorization.

  4. Geolocation: Auth0 can track the geographic location of login attempts and flag suspicious activity from locations that are known for high levels of cybercrime.

  5. Risk-Based Authentication: Auth0 can use a risk-based approach to authentication, taking into account factors such as the user's location, device, and behavior to determine the level of risk and adjust authentication requirements accordingly.

In addition to these mechanisms, Auth0 provides a dashboard where you can monitor login activity and detect suspicious behavior manually. Auth0 also provides alerting and notification mechanisms to help you respond to suspicious activity in a timely manner. Overall, Auth0 employs a combination of techniques to detect and prevent suspicious activity, helping to keep your application secure.

How secure is OIDC?

OpenID Connect (OIDC) is designed with security in mind and has several features that help make it a secure protocol for authentication and authorization.

Here are some ways in which OIDC can be secure:

  1. Encryption: OIDC requires the use of Transport Layer Security (TLS) to encrypt all communication between the client application and the authorization server. This helps prevent eavesdropping, tampering, and other attacks.

  2. Token-Based: OIDC uses tokens to convey identity and authorization information. Tokens are digitally signed and can be encrypted to protect them from tampering and unauthorized access.

  3. Authentication: OIDC requires authentication of both the client application and the end user. This helps ensure that only authorized parties can access protected resources.

  4. Authorization: OIDC provides fine-grained authorization through the use of scopes, which allow the client application to request access to only the resources it needs.

  5. Standards-Based: OIDC is based on open standards such as OAuth 2.0 and JSON Web Tokens (JWTs), which have been widely adopted and tested in a variety of contexts.

That being said, the security of OIDC also depends on how it is implemented and configured. Developers and system administrators should follow security best practices, such as using strong passwords, keeping software up to date, and restricting access to sensitive resources.

Additionally, some security concerns have been raised around OIDC, such as the potential for phishing attacks and the need for secure token storage. It's important to be aware of these concerns and take appropriate measures to mitigate them.

With Auth0 and OIDC, HooT is equipped with the best and latest security standards.

· 8 min read

Voice over Internet Protocol (VoIP) and Web Real-Time Communication (WebRTC) are two technologies that have transformed the way we communicate over the internet. In this blog, we will discuss what VoIP and WebRTC are, how they work, and their advantages.

Voice over Internet Protocol (VoIP)

VoIP is a technology that allows users to make voice and video calls over the internet instead of traditional phone lines. VoIP uses the internet to transmit voice and video data in digital form, allowing for faster and more efficient communication. VoIP has become increasingly popular due to its low cost and convenience, and it is now used by businesses and individuals around the world.

How VoIP Works

VoIP works by converting analog voice signals into digital data packets that can be transmitted over the internet. When a user makes a VoIP call, their voice is converted into digital data packets that are sent over the internet to the recipient's device. The recipient's device then converts the digital data packets back into analog voice signals, allowing the recipient to hear the caller's voice.

Advantages of VoIP

One of the main advantages of VoIP is its low cost. VoIP calls are generally cheaper than traditional phone calls, especially for international calls. VoIP also offers advanced features such as call forwarding, voicemail, and caller ID. Additionally, VoIP can be used on a variety of devices including smartphones, tablets, and computers, making it a convenient platform for communication.

Web Real-Time Communication (WebRTC)

WebRTC is a technology that enables real-time communication between browsers and devices using web-based applications. WebRTC allows users to make voice and video calls, share files, and collaborate on projects without the need for additional software or plugins. WebRTC has become increasingly popular due to its convenience and ease of use.

How WebRTC Works

WebRTC uses a peer-to-peer (P2P) connection to transmit data between devices, allowing for real-time communication. When a user initiates a WebRTC call, their browser sends a request to the recipient's browser, which responds with their own data. The two browsers then exchange data directly, without the need for a central server. This allows for faster and more efficient communication, as there is no delay caused by server processing.

Advantages of WebRTC

One of the main advantages of WebRTC is its ease of use. WebRTC can be used on a variety of devices without the need for additional software or plugins. This makes it a convenient platform for communication and collaboration. Additionally, WebRTC offers advanced features such as screen sharing, file sharing, and collaboration tools, making it a versatile platform for businesses and teams.

In conclusion, VoIP and WebRTC are two technologies that have revolutionized the way we communicate over the internet. They offer low cost, convenience, and advanced features, making them popular platforms for businesses and individuals around the world. Whether you are looking to make a voice or video call, share files, or collaborate on a project, VoIP and WebRTC offer efficient and convenient solutions for all your communication needs.

Applications in Trading & Finance

Voice over Internet Protocol (VoIP) has become an increasingly popular technology in the trading and finance industries. VoIP enables traders and financial professionals to communicate in real-time over the internet, allowing for faster and more efficient communication. In this blog, we will discuss the usage of VoIP in trading and finance and its benefits.

  • Real-time communication: VoIP enables traders and financial professionals to communicate in real-time, allowing for faster decision-making and execution. Real-time communication is essential in the trading and finance industries, where market conditions can change rapidly. VoIP allows traders and financial professionals to stay connected and informed at all times, regardless of their location.
  • Lower costs: VoIP is generally cheaper than traditional phone lines, making it a cost-effective solution for businesses in the trading and finance industries. VoIP calls are often free or significantly cheaper than traditional phone calls, especially for international calls. This allows businesses to save money on communication costs and invest in other areas of their operations.
  • Advanced features: VoIP offers advanced features such as call forwarding, voicemail, and caller ID. These features are essential in the trading and finance industries, where missed calls or delayed messages can result in significant losses. VoIP also allows for conference calls, making it easier for traders and financial professionals to collaborate on projects and strategies.
  • Enhanced security: VoIP offers enhanced security features such as encryption, which is important in the trading and finance industries where sensitive information is often exchanged. VoIP encryption ensures that calls and messages are secure and protected from unauthorized access.
  • Remote work: VoIP enables traders and financial professionals to work remotely, allowing for greater flexibility and efficiency. Remote work has become increasingly popular in the trading and finance industries, as it allows professionals to work from anywhere in the world. VoIP enables remote workers to stay connected and collaborate with their colleagues, regardless of their location.

In conclusion, VoIP has become an essential technology in the trading and finance industries, enabling real-time communication, lower costs, advanced features, enhanced security, and remote work. As the trading and finance industries continue to evolve, VoIP will play an increasingly important role in facilitating efficient and effective communication. Businesses in these industries should consider implementing VoIP as part of their communication strategy to stay competitive and stay ahead of the curve.

Digital Trading Turrets

Digital trading turrets are communication systems used in trading rooms and financial institutions for real-time voice communication between traders, brokers, and clients. They are advanced communication systems that enable traders and brokers to access multiple communication channels and tools such as telephone lines, intercom systems, speaker systems, and other electronic devices from a single device.

Digital trading turrets are designed to provide traders and brokers with a secure and efficient communication system, allowing them to communicate with each other and their clients in real-time. They offer a range of advanced features, including:

img.png

  1. Multiple Lines: Trading turrets enable traders and brokers to handle multiple lines simultaneously, allowing them to communicate with multiple clients at the same time.

  2. Intercom Systems: Trading turrets are equipped with intercom systems that enable traders and brokers to communicate with each other directly, without the need for a phone line.

  3. Speaker Systems: Trading turrets are equipped with speaker systems that enable traders and brokers to communicate with large groups of people at the same time.

  4. Call Recording: Trading turrets can record all calls, providing a record of all transactions and conversations.

  5. Encryption: Trading turrets provide a high level of encryption to ensure that all calls are secure and protected from unauthorized access.

  6. Digital trading turrets are also equipped with a range of advanced tools such as call routing, call forwarding, speed dialing, and conference calling, making them an essential communication tool in the trading and financial industries. They are designed to meet the specific needs of traders and brokers, providing them with a high level of efficiency, security, and reliability.

In summary, digital trading turrets are communication systems used in trading rooms and financial institutions that provide real-time voice communication between traders, brokers, and clients. They offer a range of advanced features and tools designed to meet the specific needs of traders and brokers, providing them with a secure, efficient, and reliable communication system.


HooT API in Trading Turrets

One of the key benefits of using APIs in trading turrets is the ability to automate and streamline trading workflows. For example, a trader may want to place an order in response to a particular market condition. With an API-enabled trading turret, the trader can automate this process, so that when a certain condition is met, an order is automatically placed through an integrated order management system.

HooT API

Another benefit of APIs is that they can help reduce the risk of errors and delays in trading workflows. By integrating various systems and applications with the trading turret, traders can eliminate the need for manual data entry and reduce the risk of errors. Additionally, APIs can help reduce delays in the trading process by enabling real-time communication and data exchange between systems.

APIs also enable trading turrets to be customized to meet the specific needs of individual traders and trading desks. For example, traders may have different preferences for the types of data they want to receive, or they may have specific workflows that they want to automate. APIs allow traders to tailor the trading turret system to their specific needs, resulting in a more efficient and effective trading process.

· 2 min read

Multi-platform, scalable and resilient platform for communication, collaboration and asynchronous information exchange. Built around a modern design inspired by FaceTime and Skype. Easy installation, powerful API and flexible deployment options allow you to create customised user experience in no time.

  • Scalable: high availability and reliable infrastructure built on AWS, GCP and Azure.

  • Resilient: data is replicated across multiple availability zones for maximum redundancy.

  • Multi-platform: native iPhone and iPad apps, web application and backend API.

conference create join

  • Scalable: high availability and reliable infrastructure built on AWS.

  • Resilient: data is replicated across multiple availability zones for maximum redundancy.

Create memorable and flexible communication experiences across all digital devices with HooT. HooT's platform is based on a powerful, multi-platform media engine and the most efficient, scalable set of protocols for high performance web conferencing and real time communication.

HooT is built on a cloud-native architecture that provides the flexibility and scalability required to support any type of digital interaction.

The HooT platform is easy to use, reliable and fully secure with strong authentication mechanisms in place. It also includes an easy-to-use web application for both users and administrators that can be accessed from anywhere, anytime.

HooT allows UI & automation developers to leverage it's rich and highly customisable REST API which is secured by OpenID Connect via Auth0's powerful and highly secure identity platform. HooT is a platform that allows developers to build, deploy and manage fully featured digital customer experiences in real time. It’s a powerful set of APIs and an easy-to-use web application for both users and administrators with strong authentication mechanisms in place.

#  Obtain a short lived token
export JWT=$(get_hoot_token)

# Create a Conference.
curl -v -H "Authorization: $JWT" \
--data @create_conf.json -X POST \
https://devapi.hoot.mx/v1/create_conference/Kurosawa-Family

HooT uses an AI driven mechanism to spawn media-mixing engines, which allows for scale on demand and zero costs in times when business in not active.