3 posts tagged with "ai"

View All Tags

· 5 min read

Empowering Political Campaigns with HooT.MX: A Comprehensive Use-Case Analysis of Freedom-Falcons

Note: Real name of the political party has been masked.

Introduction: In the realm of political campaigns, effective communication plays a pivotal role in conveying messages, mobilizing supporters, and fostering engagement. This use-case document delves into the success story of Freedom-Falcons, a prominent political party, and their utilization of HooT.MX, a powerful digital communication platform. We will explore how Freedom-Falcons leveraged the collaboration features and rich API of HooT.MX during a national campaign, highlighting the effective management of security through Auth0 and the scalability achieved using Kubernetes.

  1. Background and Challenges: Freedom-Falcons embarked on a nationwide political campaign, aiming to connect with citizens, engage supporters, and disseminate their vision effectively. They faced challenges in ensuring seamless digital communications, secure interactions, and scalability to accommodate a growing user base. Traditional communication methods were insufficient for reaching a diverse and geographically dispersed audience.

  2. HooT.MX: Revolutionizing Digital Communications: Freedom-Falcons identified HooT.MX as an ideal solution for their digital communication needs. With its comprehensive feature set and rich API, HooT.MX empowered the party workers and the digital cell to collaborate effectively and engage with supporters.

  3. Collaboration Features and Benefits: HooT.MX offered a plethora of collaboration features that proved instrumental in Freedom-Falcons' success. The party workers and leaders could seamlessly leverage these features for efficient campaign management:

falcons

Real-time Video Conferencing: Freedom-Falcons conducted virtual town halls, interactive sessions, and press conferences through HooT.MX's high-quality video conferencing capabilities. This enabled leaders to connect with supporters from all corners of the nation, fostering a sense of inclusion and engagement.

Screen Sharing and Document Collaboration: Party workers shared campaign materials, presentations, and policy documents through HooT.MX's screen sharing and document collaboration features. This facilitated efficient collaboration and streamlined decision-making processes.

Polls and Surveys: Freedom-Falcons utilized HooT.MX's polling feature to gather feedback, gauge public sentiment, and make informed strategic decisions. The integration of real-time polling during virtual events allowed for immediate engagement and data-driven decision-making.

  1. Harnessing the Power of HooT.MX API: Freedom-Falcons recognized the immense potential of HooT.MX's rich API to automate workflows, streamline processes, and enhance their digital campaign infrastructure. The API served as a bridge between HooT.MX and their existing systems, enabling seamless integration and leveraging data in real time.

Workflow Automation: Freedom-Falcons automated various campaign-related workflows using HooT.MX's API. For instance, they integrated HooT.MX with their CRM system to automatically create contacts for new event attendees, track attendee engagement, and personalize outreach efforts. This significantly reduced manual effort and streamlined data management.

Real-time Alerts and Notifications: HooT.MX's API allowed Freedom-Falcons to set up real-time alerts and notifications for critical campaign events. They integrated the API with their campaign monitoring system, which triggered alerts for significant milestones, high-engagement activities, or important announcements. This ensured that campaign managers and leaders were promptly informed, enabling timely response and strategic decision-making.

Data-driven Targeted Outreach: The API integration facilitated data synchronization between HooT.MX and Freedom-Falcons' campaign database. This allowed the party to leverage insights gained from HooT.MX's engagement analytics and audience data. By analyzing attendee behavior and preferences, Freedom-Falcons could tailor their outreach efforts and deliver personalized messages to specific voter segments, maximizing impact and resonance.

  1. Security Management with Auth0: To ensure the utmost security of their digital communication

channels, Freedom-Falcons implemented Auth0, a leading identity management platform. Auth0's robust authentication and authorization capabilities safeguarded sensitive data, mitigated the risk of unauthorized access, and enhanced user trust. With Auth0, Freedom-Falcons could efficiently manage user identities, implement multi-factor authentication, and enforce security best practices.

Auth0 Integration: By integrating Auth0 with HooT.MX, Freedom-Falcons established a secure and seamless user authentication experience. Auth0's flexible configuration options allowed them to enforce specific authentication methods, including multi-factor authentication for party members and leaders accessing sensitive campaign-related information. This enhanced security bolstered user confidence and protected sensitive campaign data from unauthorized access.

  1. Achieving Scalability with Kubernetes: Freedom-Falcons recognized the importance of a scalable infrastructure to accommodate an expanding user base. By leveraging Kubernetes, an open-source container orchestration platform, they ensured seamless scalability, efficient resource management, and fault tolerance. Kubernetes enabled Freedom-Falcons to handle surges in demand during critical campaign periods while maintaining high availability and performance.

Kubernetes Deployment: Freedom-Falcons deployed HooT.MX on a Kubernetes cluster, allowing automatic scaling of resources based on demand. This ensured that the platform could handle increased user traffic during high-profile events and rallies. Kubernetes' containerization approach provided isolation and flexibility, allowing Freedom-Falcons to deploy additional instances of HooT.MX when needed and efficiently utilize computing resources.

  1. Real-world Examples and Testimonials: Throughout the national campaign, Freedom-Falcons witnessed remarkable outcomes and received positive feedback from supporters, volunteers, and party workers.

Arvinda Samarth, a campaign volunteer, noted, "HooT.MX's collaboration features were a game-changer. We could seamlessly organize virtual events, share documents, and engage with supporters in real time. The API integrations enabled us to automate our outreach efforts and deliver personalized messages, saving us valuable time and effort."

Nivedita Thakur, a party worker, shared her experience, "The integration of Auth0 ensured that our digital communication channels were secure, and user authentication was seamless. We could focus on campaigning, knowing that our supporters' data and interactions were protected."

  1. Conclusion: Freedom-Falcons' collaboration with HooT.MX during their national campaign exemplifies the transformative impact of advanced digital communication platforms. By leveraging HooT.MX's rich API, collaboration features, and integrating security measures with Auth0, Freedom-Falcons successfully connected with citizens, fostered engagement, and achieved scalability using Kubernetes. The case of Freedom-Falcons serves as an inspiration for political parties and organizations seeking to leverage technology for effective campaigning.

In conclusion, the comprehensive use-case analysis of Freedom-Falcons showcases how HooT.MX, along with the integration of Auth0 and Kubernetes, facilitated seamless digital communications, enhanced collaboration, and ensured secure interactions. This success story, with its real-world examples and testimonials, stands as a testament to the potential of advanced communication platforms in political campaigns, offering valuable insights for software product managers and developers aiming to leverage similar technologies for transformative purposes.

Word count: 897

· 6 min read

The Command and Control (C2) market with respect to fleets of vehicles refers to the technology, software, and services that enable military, government, and commercial organizations to manage and control their fleets of vehicles in real-time.

In this market, C2 systems via HooT API are used to coordinate the movement, positioning, and deployment of vehicles, such as military convoys, emergency response vehicles, commercial fleets, and public transportation. These systems use advanced technologies, such as GPS tracking, internet communication, and integration with collaboration engines to provide situational awareness, decision-making support, and efficient resource allocation.

HooT's API platform with respect to fleets of vehicles includes a range of solutions, from standalone software applications to integrated hardware and software systems. The API can be customized to meet the specific needs of each organization, depending on the size of the fleet, the type of vehicles, the nature of the mission, and the operational environment.

The demand for C2 systems in the fleet management market is driven by the increasing need for efficient and secure vehicle operations, improved situational awareness, and real-time decision-making support. This market is expected to continue growing as the demand for advanced fleet management solutions increases, especially in the military and emergency response sectors.

The HooT Application

A major fleet management company can automate and relay fleet missions, broadcast alerts, and enable fleet-client communication dynamically with geospatial awareness and realtime information.

Mission

The mission is to send deliveries across a large metropolitan area, while enabling

  • real-time awareness of the current zone
  • update of mission and new workflow adoption
  • client to vehicle communication for any modifications in the plan
  • group communication within fleets
  • point-to-point channel with the vehicle-driver

Delivery of aforementioned workflows can be achieved with an internet-enabled, smart-phone or tablet installed in the vehicle.

Real-time conference switches and awareness

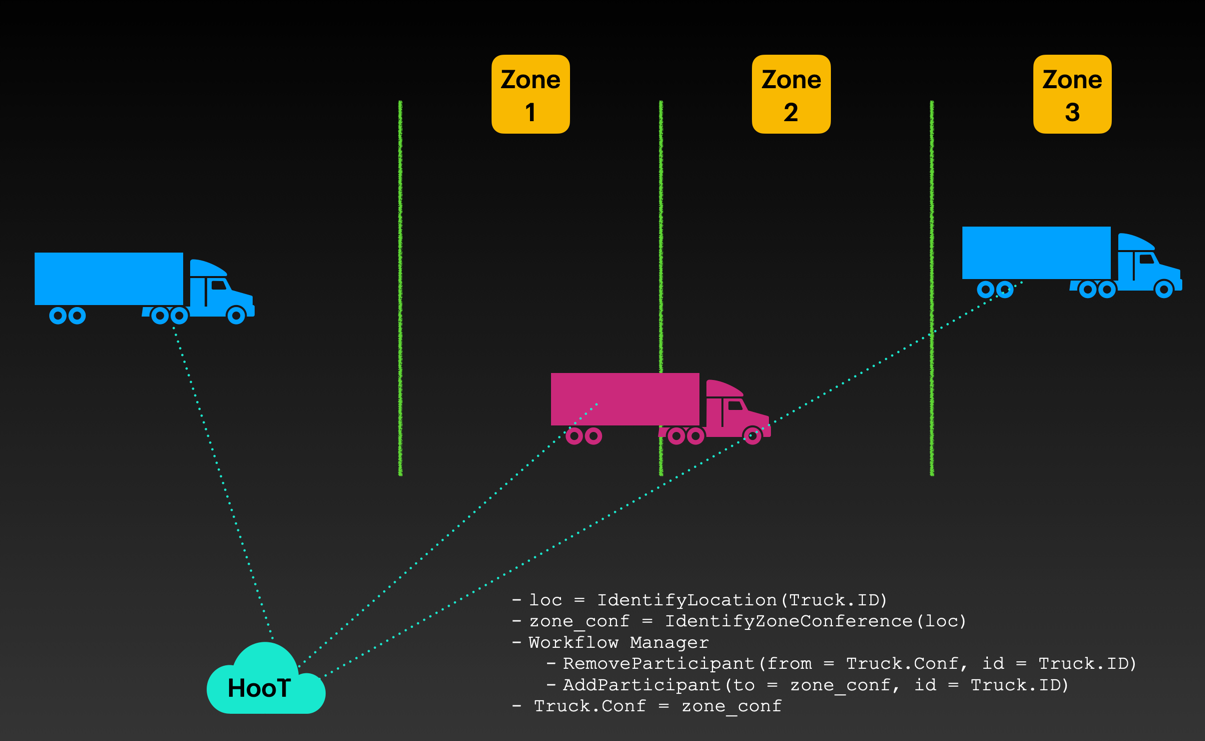
Using CoreLocation in iOS and Geocoder in Android, identifying the location of a vehicle and then pinning it to a contextual travel-zone can be accomplished. Every geographically demarcated travel-zone will have an automatically created conference bridge of it's own.

Upon entering a new zone, the vehicle could automatically join the conference bridge of that zone for real-time mission updates and regional updates.

Sample Code for workflow

Getting the location from device

// Android
import android.Manifest
import android.content.Context
import android.content.pm.PackageManager
import android.location.Location
import androidx.core.app.ActivityCompat
import com.google.android.gms.location.FusedLocationProviderClient
import com.google.android.gms.location.LocationServices

fun getCurrentLocation(context: Context, callback: (Location?) -> Unit) {
val fusedLocationClient: FusedLocationProviderClient = LocationServices.getFusedLocationProviderClient(context)

if (ActivityCompat.checkSelfPermission(context, Manifest.permission.ACCESS_FINE_LOCATION) != PackageManager.PERMISSION_GRANTED) {
// Permission not granted, handle accordingly
callback(null)
return
}

fusedLocationClient.lastLocation.addOnSuccessListener { location: Location? ->
// Got last known location. In some rare situations this can be null.
callback(location)
}
}

Using the location function

getCurrentLocation(this) { location ->
// Do something with the location object
if (location != null) {
val latitude = location.latitude
val longitude = location.longitude
// ...
} else {
// Location is null, handle accordingly
}
}

API for adding/removing from conference

# Remove the truck_id from previous_zone_conf_id
curl -v -H "Authorization: $JWT" \
-X POST --data '{"remove_users": truck_id,..}' \
https://devapi.hoot.mx/v1/edit_conference/{previous_zone_conf_id}

# Add the truck to new_zone_conf_id
curl -v -H "Authorization: $JWT" \
-X POST --data '{"new_participants": truck_id,..}' \
https://devapi.hoot.mx/v1/edit_conference/{new_zone_conf_id}

Mission Updates

  • Live chats can be relayed to all conference users
  • Priority of notifications can be decided by the admin-relayer

Client to Vehicle Communication

During the course of the mission, upcoming milestones can trigger a communication link to the milestone client.

The milestone-client, in case of exceptions and emergencies can join the communication link via web on their mobile devices and communicate about the situation.

Algorithm

  1. Identify next N milestones
  2. Invite the milestone clients to join a unique link to communicate about their situation if they need to.
  3. Remove the links once the milestone is complete.
def milestone_communications(truck, next_communication_size=5):
for milestone in truck.milestones[:next_communication_size]:
truck.send_comm_link(milestone.client_comm_address)

Group Communications and Event Notification

The truck could automatically subscribe to the event-loop using the glayr-api.

All the urgent-communication events would then flash with the name of the relayer on the dashboard of the driver.

Similarly, for the admin to directly communicate with the truck on a private secure channel, they can invoke the API to kickstart the collaboration.

Advanced Usage

Using AI and collaborating with our team of engineers and data-scientists we can create innovative ways to identify certain situations.

One of the use-cases our team came across was to identify distress from conference voice streams.

Goal: Distress Identification from fleet conferences.

  1. We created a model trained to detect distress in voice streams.
  2. We deployed an analyzer to our Kurento media stream
  3. Identified the distress.
import tensorflow as tf
import numpy as np
from kurento.client import KurentoClient, MediaPipeline, MediaElement, MediaPad, WebRtcEndpoint

# Define the TensorFlow model and input/output tensors
model = tf.keras.models.load_model('distress_model.h5')
input_tensor = model.inputs[0]
output_tensor = model.outputs[0]

# Connect to Kurento Media Server
kurento_client = KurentoClient('ws://localhost:8888/kurento')
pipeline = kurento_client.create('MediaPipeline')
webrtc = pipeline.create('WebRtcEndpoint')
webrtc.connect(pipeline)

# Create a GStreamer element that captures the voice stream and feeds it to the TensorFlow model
caps = 'audio/x-raw,format=S16LE,channels=1,layout=interleaved,rate=44100'
src_element = pipeline.create('GstAppSrc', caps=caps)
src_pad = src_element.create_src_pad()
src_element.connect('need-data', on_need_data)

# Define the callback function that processes the voice stream with the TensorFlow model
def on_need_data(src, length):
# Get the voice stream data from the Kurento WebRtcEndpoint
data = webrtc.emit('generate-data-event', length)

# Preprocess the data for the TensorFlow model
audio = np.frombuffer(data, np.int16)
audio = tf.audio.encode_wav(audio, sample_rate=44100)
audio = tf.io.decode_wav(audio.content)[0]
audio = tf.expand_dims(audio, axis=0)

# Pass the data through the TensorFlow model to make a prediction
prediction = model.predict(audio)[0]
if prediction[0] > prediction[1]:
# No distress detected
print('No distress detected')
else:
# Distress detected
print('Distress detected')

This code uses TensorFlow to load a pre-trained model that has been trained to detect distress in voice streams. It then creates a Kurento Media Pipeline and a WebRtcEndpoint. The GStreamer element GstAppSrc is used to capture the voice stream from the WebRtcEndpoint and feed it to the TensorFlow model. The on_need_data callback function is called whenever new data is available, and it processes the data with the TensorFlow model to make a prediction. If the model predicts that distress is present in the voice stream, the callback function outputs a message indicating that distress has been detected.

Note that this is a simple example and that the TensorFlow model used in this code is just a placeholder. In practice, you would need to train a more sophisticated model on a large dataset of distressful voice streams in order to achieve accurate results.

In a future blog we will discuss training voice-distress models in more detail.

· 14 min read

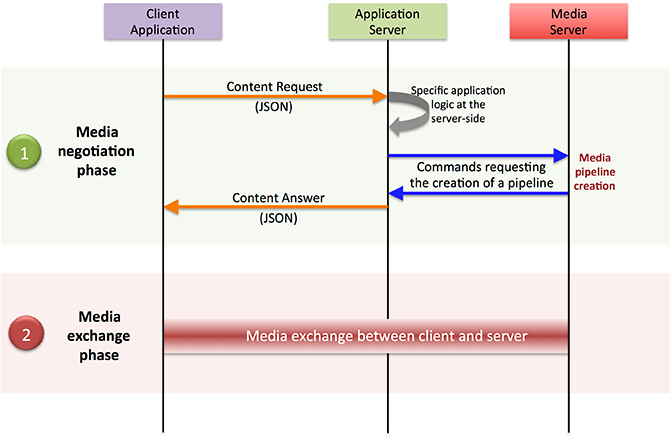
Kurento Media Server (KMS) is an open-source media server that allows developers to build real-time multimedia applications and services. It provides a set of media processing capabilities, including audio and video recording, playback, streaming, and manipulation.

The architecture of Kurento Media Server is based on a modular design that allows it to be easily extended and customized to meet specific requirements. The main components of Kurento Media Server are:

  • Media Processing Elements (MPEs): These are the functional modules that perform the actual media processing tasks, such as encoding, decoding, filtering, and mixing. MPEs can be combined in different ways to create complex media processing pipelines.

  • Pipeline: A pipeline is a logical sequence of MPEs that are connected to form a processing graph. Each MPE in the pipeline processes the media data and passes it on to the next MPE in the sequence.

  • WebRTC Signaling: Kurento Media Server uses WebRTC signaling protocols to establish and manage real-time communication sessions between endpoints. The signaling messages are used to negotiate the session parameters, exchange media data, and control the media processing pipeline.

  • Media Server API: Kurento Media Server provides a RESTful API that allows developers to control the media processing pipeline and configure the MPEs. The API also provides access to various media statistics, such as bitrates, frame rates, and packet loss.

  • Media Server Client: The media server client is the end-user application that uses the Kurento Media Server to perform real-time media processing tasks. The client can be a web-based application, a mobile application, or a desktop application.

Overall, the architecture of Kurento Media Server is designed to be flexible and scalable, allowing developers to create customized media processing solutions for a wide range of use cases.

         +-------------------+
| Media Server API |
+-------------------+
| |
| RESTful Interface |
| |
+-------------------+
| |
| Media Processing |
| |
+---------+---------+
|
|
v
+---------+---------+
| Pipeline |
+---------+---------+
|
|
v
+---------+---------+
| Media Processing |
| Element (MPE) |
+---------+---------+
|
|
v
+---------+---------+
| WebRTC Signaling |
+-------------------+

As shown in the diagram, the Media Server API provides a RESTful interface for controlling the media processing pipeline and accessing media statistics. The pipeline consists of a sequence of MPEs that process media data, and the WebRTC Signaling is used to establish and manage real-time communication sessions between endpoints. The Media Server Client interacts with the Media Server API to control the pipeline and perform real-time media processing tasks.

WebRTC Signalling

WebRTC signaling is an essential component of the real-time communication system enabled by Kurento Media Server. It enables endpoints to negotiate and establish communication channels over the internet.

In the context of Kurento Media Server, WebRTC signaling is used to establish and manage real-time communication sessions between endpoints. This includes protocols like SDP (Session Description Protocol) and ICE (Interactive Connectivity Establishment).

Here's how WebRTC signaling works within Kurento Media Server:

  • WebRTC Offer/Answer: When an endpoint wants to establish a WebRTC session with another endpoint, it sends an offer message that includes information about its capabilities, such as the codecs it supports, and the transport protocols it can use. The other endpoint responds with an answer message that includes its capabilities.

  • ICE Candidates: Once the endpoints have exchanged offer and answer messages, they need to determine the best network path to use for the communication session. Each endpoint generates a list of ICE candidates, which are potential network paths that can be used for communication. The endpoints exchange these ICE candidates and use them to establish a direct peer-to-peer connection.

  • SDP Negotiation: Once the endpoints have established a direct connection, they use the Session Description Protocol (SDP) to negotiate the details of the communication session. This includes the media types (e.g., audio or video), the codecs, and the transport protocols to be used for each media type.

  • Media Pipeline: Once the SDP negotiation is complete, Kurento Media Server sets up a media processing pipeline based on the negotiated parameters. The pipeline consists of a sequence of Media Processing Elements (MPEs) that process the media data, such as encoding, decoding, filtering, and mixing.

  • Real-time Communication: With the media pipeline in place, the endpoints can start to exchange media data in real-time, using the agreed-upon media formats and protocols.

In summary, WebRTC signaling within Kurento Media Server is used to establish and manage real-time communication sessions between endpoints. It enables endpoints to negotiate the details of the communication session, determine the best network path, and establish a direct peer-to-peer connection. Once the connection is established, Kurento Media Server sets up a media processing pipeline that processes the media data in real-time.

              Endpoint A                  Endpoint B
| |
| |
| |
(1) Offer SDP (2) Answer SDP
| |
| |
| |
+--------------+--------------+ +--------------+--------------+
| | | |
| (3) ICE Candidate Exchange | | (3) ICE Candidate Exchange |
| | | |
+--------------+--------------+ +--------------+--------------+
| |
| |
| |
(4) SDP Negotiation (4) SDP Negotiation
| |
| |
| |
+--------------+--------------+ +--------------+--------------+
| | | |
| (5) Real-time | | (5) Real-time |
| Communication Begins | | Communication Begins |
| | | |
+------------------------------+ +------------------------------+

The diagram shows two endpoints, A and B, that want to establish a WebRTC communication session using Kurento Media Server. Here's how the signaling process works:

  • Endpoint A sends an Offer SDP message to Kurento Media Server, which includes information about its capabilities, such as the codecs it supports, and the transport protocols it can use.
  • Kurento Media Server forwards the Offer SDP message to Endpoint B, which responds with an Answer SDP message that includes its capabilities.
  • Endpoint A and Endpoint B exchange ICE candidates, which are potential network paths that can be used for communication. The ICE candidates are used to determine the best network path for the communication session.
  • Endpoint A and Endpoint B negotiate the details of the communication session using SDP. They agree on the media types (e.g., audio or video), the codecs, and the transport protocols to be used for each media type.
  • With the communication parameters negotiated, real-time communication begins between Endpoint A and Endpoint B. Media data is exchanged using the agreed-upon media formats and protocols. In summary, WebRTC signaling within Kurento Media Server enables endpoints to negotiate and establish real-time communication sessions, using protocols like SDP and ICE. The signaling process ensures that the endpoints agree on the media formats, codecs, and transport protocols to be used for the communication session, and establish a direct peer-to-peer connection for efficient data transfer.

architecture

ICE Candidates

In WebRTC, Interactive Connectivity Establishment (ICE) is used to establish a direct peer-to-peer connection between endpoints, which is necessary for real-time communication. ICE candidates are network addresses that are used by ICE to establish a direct connection between endpoints.

In WebRTC, there are two types of ICE candidates: host candidates and server-reflexive candidates.

  • Host Candidates: A host candidate is an IP address and port number associated with the device where the endpoint is running. These are local network addresses of the endpoint's machine that can be used for direct communication if both endpoints are on the same network.

  • Server-Reflexive Candidates: Server-reflexive candidates are network addresses that are obtained by sending a request to a STUN (Session Traversal Utilities for NAT) server. These candidates are obtained by using a NAT traversal technique that allows the endpoint to determine its public IP address and port number, which can be used for communication with endpoints outside of its local network.

To determine the ICE candidates, WebRTC endpoints perform a series of steps:

  • Each endpoint collects a list of its local IP addresses and ports. These are the host candidates.

  • Each endpoint sends a STUN request to a STUN server. The STUN server responds with a server-reflexive candidate, which includes the public IP address and port number of the endpoint.

  • If the endpoints are unable to establish a direct connection using host and server-reflexive candidates, they may also use other types of candidates such as relay candidates, which are obtained by using a TURN (Traversal Using Relay NAT) server.

  • The endpoints exchange their list of ICE candidates over the signaling channel and use them to establish a direct connection.

The ICE negotiation process continues until a direct connection is established between the endpoints or until all candidate types have been exhausted. The ICE negotiation process is important for WebRTC communication because it allows endpoints to establish a direct connection even when they are behind firewalls and NATs that would otherwise prevent direct communication.

Configuring ICE

To configure ICE candidates in Kurento Media Server, you typically follow these steps:

  • Collect the local IP addresses and ports that can be used as ICE candidates for the WebRTC endpoint.

  • Create an IceCandidate object for each candidate, specifying the candidate's transport protocol, IP address, port number, and any other relevant properties.

  • Add the IceCandidate objects to the WebRTC endpoint's WebRtcEndpoint using the addIceCandidate method.

  • Wait for the remote endpoint to send its SDP offer, which includes its own ICE candidates.

  • Process the remote endpoint's SDP offer to determine its ICE candidates.

  • Add the remote endpoint's ICE candidates to the WebRTC endpoint's WebRtcEndpoint using the addIceCandidate method.

  • Start the ICE connectivity checks between the endpoints to determine the best candidate pair for establishing a direct connection.

// Create a new IceCandidate object with the candidate properties
IceCandidate candidate = new IceCandidate.Builder()
.withFoundation("foundation")
.withComponentId(1)
.withTransport("UDP")
.withPriority(12345678)
.withIp("192.168.1.100")
.withPort(1234)
.withType(CandidateType.HOST)
.withGeneration(0)
.build();

// Get the WebRtcEndpoint to which the IceCandidate will be added
WebRtcEndpoint webRtcEndpoint = ...;

// Add the IceCandidate to the WebRtcEndpoint
webRtcEndpoint.addIceCandidate(candidate);

Bandwidth Management within KMS

Bandwidth management and configuration is an important aspect of optimizing the performance of media streams in Kurento Media Server. Kurento provides several mechanisms to manage bandwidth usage, including:

  1. Bitrate Adaptation: Kurento can automatically adjust the bitrate of media streams based on network conditions and available bandwidth. This can help improve the quality of media while avoiding congestion and packet loss.

  2. Dynamic Bandwidth Allocation: Kurento can allocate bandwidth dynamically to media streams based on their priority, size, and other parameters. This can help ensure that critical media streams receive sufficient bandwidth while minimizing the impact on other streams.

  3. Congestion Control: Kurento can detect and respond to network congestion by reducing the bitrate of media streams or dropping packets selectively. This can help prevent network overload and improve overall performance.

To configure bandwidth management in Kurento Media Server, you can use the following settings:

  • maxOutputBitrate: This property sets the maximum output bitrate that can be used by media streams in Kurento. It can be set globally or for individual media elements and endpoints.

  • minOutputBitrate: This property sets the minimum output bitrate that should be used by media streams in Kurento. It can be used to ensure that media streams maintain a minimum quality level even in low bandwidth conditions.

  • adaptationSet: This property configures the bitrate adaptation algorithm used by Kurento. It can be set to different values, such as "fixed", "fluid", or "manual", depending on the desired behavior.

  • priority: This property sets the priority of individual media streams in Kurento. Higher priority streams will receive more bandwidth allocation and higher quality.

Example of configuring bandwidth using Kurento API

from kurento_client import KurentoClient, MediaPipeline, WebRtcEndpoint

# Create a Kurento Client object
kurento_client = KurentoClient('ws://localhost:8888/kurento')

# Create a new media pipeline
pipeline = kurento_client.create('MediaPipeline')

# Create a WebRTC endpoint and connect it to the pipeline
webrtc = WebRtcEndpoint.Builder(pipeline).build()
webrtc.connect(webrtc)

# Configure bandwidth management settings
webrtc.set_max_output_bitrate(1000) # Set max output bitrate to 1000 kbps
webrtc.set_min_output_bitrate(500) # Set min output bitrate to 500 kbps
webrtc.set_priority(1) # Set priority to 1

# Start the media pipeline and WebRTC endpoint
pipeline.play()
webrtc.gather_candidates()

# Use the WebRTC endpoint to transmit and receive media

Media Profile in Kurento

Example - configuring media profiles in KMS

import org.kurento.client.*;
import org.kurento.client.MediaProfileSpecType;
import org.kurento.client.MediaProfileSpec;

// Create a new media pipeline
MediaPipeline pipeline = kurento.createMediaPipeline();

// Create a new WebRTC endpoint and connect it to the pipeline
WebRtcEndpoint webrtc = new WebRtcEndpoint.Builder(pipeline).build();
webrtc.connect(webrtc);

// Configure media profile settings
MediaProfileSpec mediaProfile = new MediaProfileSpec.Builder()
.withVideoCodec(VideoCodec.H264)
.withAudioCodec(AudioCodec.OPUS)
.withTransport(Transport.TCP)
.withMediaType(MediaProfileSpecType.WEBM)
.withMaxVideoBitrate(2000)
.withMaxAudioBitrate(128)
.withMinVideoBitrate(1000)
.withMinAudioBitrate(64)
.build();
webrtc.setMediaProfile(mediaProfile);

// Start the media pipeline and WebRTC endpoint
pipeline.play();
webrtc.gatherCandidates();

// Use the WebRTC endpoint to transmit and receive media

Analytics in KMS

Kurento Media Server supports integration with different analytics tools, such as monitoring systems, data processing platforms, and machine learning models.

from kurento_client import KurentoClient, MediaPipeline, MediaElement

# Create a Kurento client instance
kurento_client = KurentoClient('ws://<your-kms-address>:8888/kurento')

# Create a media pipeline
pipeline = kurento_client.create('MediaPipeline')

# Create a media element, for example a WebRTC endpoint
webrtc = pipeline.create('WebRtcEndpoint')

# Enable gathering of stats for the endpoint
webrtc.enable_stats_events('EndpointStats')

# Connect the endpoint to other media elements in the pipeline
# ...

# Start the pipeline
pipeline.play()

# Get stats for the endpoint
stats = webrtc.get_stats()

# Process the stats
# ...

# Release resources
webrtc.release()
pipeline.release()
kurento_client.close()

Use Case Studies

AI Based QoS in KMS

AI-based Quality of Service (QoS): Kurento can be integrated with AI algorithms to monitor and optimize the QoS of media streams. AI-based QoS algorithms can automatically adjust the media stream parameters such as resolution, bitrate, frame rate, and more based on network conditions, device capabilities, and user preferences.

Example of AI based QoS with Tensorflow

from kurento_client import MediaPipeline, WebRtcEndpoint
import tensorflow as tf

class AIQoS:
def __init__(self, pipeline: MediaPipeline, webrtc: WebRtcEndpoint):
self.pipeline = pipeline
self.webrtc = webrtc
self.sess = tf.Session()
self.graph = self.build_graph()
self.qos = self.graph.get_tensor_by_name('qos:0')

def build_graph(self):
graph = tf.Graph()
with graph.as_default():
input_tensor = tf.placeholder(tf.float32, shape=[None, 2])
output_tensor = tf.layers.dense(input_tensor, 1, activation=tf.sigmoid, name='qos')
return graph

def adjust_qos(self, bandwidth: float):
input_data = [[self.webrtc.getMeasuredLatency(), bandwidth]]
qos_value = self.sess.run(self.qos, feed_dict={self.graph.get_tensor_by_name('Placeholder:0'): input_data})
self.webrtc.setVideoMaxBandwidth(qos_value * bandwidth)

Speech Recognition & NLP using KMS

Machine Learning (ML) based image and speech recognition: Kurento can be integrated with ML libraries such as TensorFlow, Keras or OpenCV to perform tasks such as object detection, facial recognition, emotion detection, speech recognition, and more. Kurento can process media streams and provide results to the ML algorithms, which can then provide intelligent insights.

Natural Language Processing (NLP): Kurento can be integrated with NLP libraries such as NLTK or spaCy to perform tasks such as sentiment analysis, topic extraction, entity recognition, and more. Kurento can provide the audio or text data to NLP algorithms and receive intelligent insights.

Example KMS integration with Google Cloud Speech-to-Text API.

from google.cloud import speech
import kurento_client

class SpeechRecognition:
def __init__(self, pipeline: kurento_client.MediaPipeline, webrtc: kurento_client.WebRtcEndpoint, language_code: str):
self.pipeline = pipeline
self.webrtc = webrtc
self.language_code = language_code
self.client = speech.SpeechClient()
self.streaming_config = speech.StreamingRecognitionConfig(
config=speech.RecognitionConfig(
encoding=speech.RecognitionConfig.AudioEncoding.OPUS,
sample_rate_hertz=48000,
language_code=language_code,
model='default'
),
interim_results=True
)
self.recognize_stream = self.client.streaming_recognize(self.streaming_config)

def on_sdp_offer(self, offer, on_response):
answer = offer
answer.sdp = self.webrtc.process_offer(offer.sdp)
on_response(answer)

def on_ice_candidate(self, candidate):
self.webrtc.add_ice_candidate(candidate)

def start_recognition(self):
self.webrtc.connect(self.pipeline)
self.pipeline.play()
self.webrtc.gatherCandidates()

for chunk in self.webrtc.get_media_element().connect(self.pipeline).pull():
if not self.webrtc.get_media_element().is_paused():
self.recognize_stream.write(chunk)

self.recognize_stream.close()

for response in self.recognize_stream:
for result in response.results:
if result.is_final:
print(result.alternatives[0].transcript)
else:
print(result.alternatives[0].transcript, end='')

Example: using the SpeechRecognition class

import kurento_client
import sys
import time

kurento_client.KurentoClient.register_modules('kurento.modules.webRtcEndpoint', 'kmsserver.kurento')

pipeline = kurento_client.MediaPipeline()

webrtc = kurento_client.WebRtcEndpoint.Builder(pipeline).build()

speech_recognition = SpeechRecognition(pipeline, webrtc, 'en-US')

@speech_recognition.on('sdp_offer')
def on_sdp_offer(offer):
print('Received SDP offer')
answer = None
speech_recognition.on_sdp_offer(offer, lambda a: nonlocal answer; answer = a)
return answer

@speech_recognition.on('ice_candidate')
def on_ice_candidate(candidate):
print('Received ICE candidate')
speech_recognition.on_ice_candidate(candidate)

speech_recognition.start_recognition()

webrtc.connect(webrtc)

with open(sys.argv[1], 'rb') as f:
while True:
chunk = f.read(960)
if not chunk:
break
webrtc.send_data(chunk)
time.sleep(0.01)

webrtc.disconnect(webrtc)

pipeline.release()